Go Back
After preparing your crust, the next step is to spread the softened ice cream over it. To achieve a smooth and even layer, it is crucial to ensure that the ice cream is adequately softened—about 10 to 15 minutes at room temperature should suffice. Use a rubber spatula to scoop out the ice cream, allowing it to soften slightly for easier spreading. Begin from the center of the crust and work your way outwards, applying gentle pressure while smoothing it evenly toward the edges. It’s essential to avoid mixing the ice cream with the crust; instead, aim for a seamless layer that stands tall against the crust.

No-Bake Ice Cream Cake

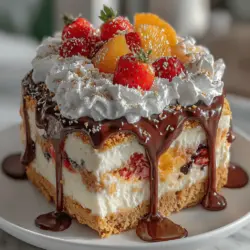
Indulge in the joy of creating a Frozen Fantasy Ice Cream Cake, a dessert perfect for any celebration. With its delightful layers of creamy ice cream and refreshing sorbet, nestled in a crunchy graham cracker crust, this cake is both visually stunning and deliciously satisfying. Customize flavors to cater to every palate, making it a cherished treat for birthdays, summer gatherings, and special occasions. Discover the ease of preparation and let your creativity shine in the kitchen!

Ingredients
  

2 cups graham cracker crumbs

1/2 cup unsalted butter, melted

1/4 cup granulated sugar

1 quart (4 cups) of your favorite ice cream, softened

1 quart (4 cups) of your favorite sorbet, softened

1 cup whipped cream (store-bought or homemade)

1/4 cup chocolate syrup or caramel sauce (for drizzling)

Fresh berries or sliced fruits (optional, for garnish)

Instructions
 

Prepare the Crust: In a medium mixing bowl, thoroughly mix the graham cracker crumbs, melted butter, and granulated sugar together. Stir until the mixture resembles wet sand, ensuring all crumbs are coated.

    Form the Base: Firmly press the crumb mixture into the bottom of a 9-inch springform pan, creating an even and compact crust. To help the crust set, place the pan in the freezer for approximately 15 minutes.

      Layer the Ice Cream: Once the crust is firm, take the softened ice cream and spread it evenly over the crust in the springform pan. Use a spatula to create a smooth, even surface. Return the pan to the freezer for an additional 30 minutes to allow the ice cream layer to firm up.

        Add the Sorbet Layer: After the ice cream layer has firmed, carefully spread the softened sorbet evenly on top. Again, use a spatula to smooth the surface, ensuring it covers the ice cream layer completely. Freeze the cake for another 30 minutes.

          Top with Whipped Cream: Once the sorbet layer is set, take the cake out of the freezer and generously spread the whipped cream over the top. Create a fluffy layer that covers the entire sorbet. Drizzle chocolate syrup or caramel sauce on top for an extra touch of sweetness.

            Final Freeze: Cover the cake with aluminum foil or plastic wrap to protect it and place it in the freezer. Allow it to freeze for at least 4 hours, or until the cake is completely firm and well set.

              Serve: Before serving, let the cake sit at room temperature for about 10 minutes. This will make slicing easier. If desired, garnish with fresh berries or slices of fruit for a pop of color. Slice into pieces and enjoy your frozen fantasy treat!

                Prep Time: 20 minutes | Total Time: 5 hours 10 minutes | Servings: 10-12 slices

                  Presentation Tips: For a visually stunning dessert, arrange garnished slices on a vibrant serving platter, and drizzle additional chocolate syrup or caramel sauce around the cake. Consider adding a few mint leaves for a refreshing touch!