Introduction
In recent years, there has been a noticeable surge in the popularity of healthy snacks, driven by a growing awareness of nutrition and wellness among consumers. As more individuals seek to make healthier choices without compromising on taste, the demand for delicious yet nutritious snacks has skyrocketed. Enter Nutty Banana Bliss Bars—a perfect solution for anyone looking to indulge their sweet tooth while also nourishing their body.
Nutty Banana Bliss Bars are not only delightful to eat but also packed with wholesome ingredients that provide various health benefits. Whether you’re a busy professional seeking a quick breakfast option, a parent looking for healthy after-school snacks for your children, or someone simply wanting a guilt-free treat, these bars cater to all. The beauty of this recipe lies in its simplicity, requiring minimal preparation time and easily accessible ingredients. With a few ripe bananas, some natural peanut butter, and rolled oats, you can whip up a batch of these delightful bars that are sure to please a wide audience.
Understanding the Ingredients
Before diving into the step-by-step instructions, it’s essential to understand the key ingredients that make up Nutty Banana Bliss Bars. Each element contributes not only to the flavor and texture but also to the overall health benefits of the final product.
Ripe Bananas
At the heart of this recipe are ripe bananas. As they ripen, bananas become naturally sweeter due to the conversion of starches into sugars, eliminating the need for excessive added sugars. Ripe bananas are also rich in dietary fiber, which aids digestion and promotes a feeling of fullness. Additionally, they provide essential vitamins and minerals, including potassium, vitamin C, and vitamin B6, making them a powerhouse ingredient.
Natural Peanut Butter
Natural peanut butter is another star ingredient in Nutty Banana Bliss Bars. It’s an excellent source of protein and healthy fats, offering a satisfying creaminess that enhances the texture of the bars. Unlike processed peanut butter, which often contains added sugars and unhealthy fats, natural peanut butter is simply ground peanuts, making it a more wholesome choice. The protein content helps keep you full longer, while the healthy fats support heart health and provide sustained energy.
Honey or Maple Syrup
To sweeten the bars without resorting to refined sugars, honey or maple syrup can be used as natural sweeteners. Both options bring their unique flavors and additional nutrients. Honey is known for its antioxidant properties and soothing effects, while maple syrup contains essential minerals like manganese and zinc. Choosing either of these natural sweeteners not only enhances the taste but also contributes to a healthier snack option.
Rolled Oats
Rolled oats serve as the backbone of the Nutty Banana Bliss Bars, providing whole-grain benefits that are hard to beat. They are an excellent source of complex carbohydrates, which provide sustained energy and help maintain stable blood sugar levels. Oats are also rich in fiber, particularly beta-glucan, which can help lower cholesterol and promote heart health. Their chewy texture complements the softness of the bananas, creating a delightful contrast in every bite.
Baking Powder, Cinnamon, and Salt
To elevate the flavor of the bars, baking powder, cinnamon, and salt play crucial roles. Baking powder acts as a leavening agent, ensuring the bars rise and achieve the perfect texture. Cinnamon adds warmth and depth, enhancing the overall taste profile with its natural sweetness. A pinch of salt is essential in balancing flavors, accentuating the sweetness of the bananas and honey or maple syrup.
Optional Ingredients
For those looking to customize their Nutty Banana Bliss Bars further, there are several optional ingredients that can be added. Dark chocolate chips provide a rich, indulgent flavor and a dose of antioxidants, while chopped nuts—such as walnuts or almonds—can add extra crunch and healthy fats. These variations not only enhance the flavor but also allow you to tailor the bars to your personal taste preferences.
Step-by-Step Instructions
Now that you’re familiar with the ingredients and their benefits, let’s move on to the preparation of Nutty Banana Bliss Bars. This step-by-step guide will ensure clarity and ease of execution, making it simple for anyone to create these delicious treats at home.
Preheating the Oven
The first step in any baking endeavor is to preheat your oven. This is a crucial step, as it ensures that your Nutty Banana Bliss Bars bake evenly and achieve the desired texture. Preheat your oven to 350°F (175°C). While the oven is warming up, you can prepare the rest of your ingredients, making efficient use of your time.
Mixing Wet Ingredients
In a large mixing bowl, begin by mashing the ripe bananas. Use a fork or a potato masher to break them down until they reach a smooth consistency. This process not only releases the natural sweetness of the bananas but also helps to incorporate air into the mixture, which is essential for a light and fluffy bar. Once your bananas are mashed, add in the natural peanut butter and honey or maple syrup. Mix these wet ingredients together until fully combined. The goal is to achieve a uniform mixture with no lumps.
Combining Dry Ingredients
In a separate bowl, combine the rolled oats, baking powder, cinnamon, and salt. Whisk them together until they are well mixed. This step is important because it prevents clumps of baking powder from forming in the final mixture, ensuring even leavening throughout the bars. Once combined, gradually add the dry mixture to the wet ingredients, stirring gently until everything is incorporated. Be careful not to overmix; a few lumps are perfectly fine.
Incorporating Mix-ins
At this stage, if you choose to include any optional ingredients such as dark chocolate chips or chopped nuts, now is the time to fold them into the batter. Gently stir the mix-ins until they are evenly distributed throughout the dough. This addition not only enhances the flavor and texture but also elevates the nutritional profile of your bars.
Baking Process
Transfer the batter into a prepared baking dish lined with parchment paper. Spread it evenly using a spatula, ensuring that it reaches the corners of the dish. Place the dish in the preheated oven and bake for approximately 20-25 minutes. To check for doneness, insert a toothpick into the center; it should come out clean or with a few moist crumbs attached.
Once baked, remove the dish from the oven and allow the bars to cool in the pan for a few minutes before transferring them to a wire rack to cool completely. This cooling process is essential, as it helps the bars firm up, making them easier to cut into squares or rectangles.
Following these steps will lead you to a batch of Nutty Banana Bliss Bars that are not only easy to make but also delicious and nutritious. The combination of ripe bananas, natural peanut butter, and wholesome rolled oats creates a satisfying snack that can be enjoyed at any time of the day. Stay tuned for the next part of the article, where we will dive into tips for best results and address common questions about this delightful recipe.
{{image_2}}
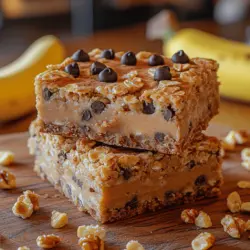
Cooling and Cutting: Best Practices for Slicing the Bars Without Crumbling
Once your Nutty Banana Bliss Bars have baked to a golden perfection, patience is key during the cooling process. Allow the bars to cool in the pan for at least 15 minutes before transferring them to a wire rack. This cooling period is essential as it helps the bars firm up, making them easier to slice without crumbling.
When it’s time to cut the bars, use a sharp knife for clean, precise cuts. To prevent sticking, consider lightly greasing the knife or running it under hot water before slicing. For the best results, cut the bars while they are still slightly warm, as this prevents them from becoming too hard. Aim for even squares or rectangles, approximately 2 inches by 4 inches, to create uniform portions. If you prefer smaller snacks, feel free to cut them into bite-sized pieces.
For added presentation, you can dust the tops of your bars with a sprinkle of crushed nuts or seeds before slicing, which not only enhances the visual appeal but also adds an extra crunch.
Nutritional Information
Understanding the nutritional profile of your Nutty Banana Bliss Bars can enhance your awareness of what you’re consuming. Here’s a breakdown of the nutritional content per serving, based on an estimated serving size of one bar (assuming the recipe yields 12 bars):
– Calories: 150
– Protein: 4g
– Fats: 7g
– Carbohydrates: 20g
– Fiber: 3g
When compared to traditional snack bars, which often contain high levels of added sugars and unhealthy fats, Nutty Banana Bliss Bars stand out as a healthier alternative. Many store-bought snack bars can contain upwards of 200-300 calories with little nutritional benefit. In contrast, these homemade bars provide natural sugars from bananas, healthy fats from nuts, and essential fibers that promote better digestion.
Serving Suggestions
The versatility of Nutty Banana Bliss Bars allows for a variety of serving suggestions that can fit into different meals or occasions. Here are some creative ways to enjoy your bars:
1. With Yogurt or Fruit: Crumble a Nutty Banana Bliss Bar over a bowl of Greek yogurt and top with fresh berries. This combination not only adds texture but also boosts the nutritional value with probiotics and antioxidants.
2. Breakfast Boost: Incorporate a bar into your breakfast routine. Pair it with a smoothie for a quick meal on busy mornings. Chop the bars into smaller pieces and mix them into oatmeal or overnight oats for added flavor and crunch.
3. On-the-Go Snack: Wrap each bar in parchment paper or place them in a reusable snack bag for a convenient grab-and-go option. They make an excellent post-workout snack or mid-afternoon energy booster.
4. Dessert Alternative: Serve the bars as a healthier dessert option. Warm them slightly in the microwave and top with a scoop of vanilla ice cream or a drizzle of almond butter for an indulgent yet nutritious treat.
Storage Tips
To keep your Nutty Banana Bliss Bars fresh and delicious, proper storage is important. Here are some best practices:
– Room Temperature: If you plan on consuming the bars within a week, store them in an airtight container at room temperature. Make sure they are completely cooled before sealing to avoid moisture accumulation.
– Refrigeration: For extended freshness, especially in warm climates, consider refrigerating the bars. They can last up to two weeks when stored in the fridge.
– Freezing: For even longer shelf life, freeze individual bars wrapped in plastic wrap and then placed in a freezer-safe bag. When you’re ready to enjoy a bar, allow it to thaw at room temperature or pop it in the microwave for a few seconds.
Health Benefits of Nutty Banana Bliss Bars
Nutty Banana Bliss Bars are not just delicious; they are packed full of health benefits due to their wholesome ingredients. Here’s a closer look at the advantages of the key components:
1. Bananas: Rich in potassium and vitamin C, bananas support heart health and provide quick energy. They also contain dietary fiber, which aids in digestion and helps you feel full longer.
2. Nuts: The nuts used in the recipe provide healthy fats, protein, and a variety of essential vitamins and minerals. Nuts are known for their ability to improve cholesterol levels and reduce the risk of heart disease.
3. Oats: Whole oats are a great source of fiber, particularly beta-glucan, which helps lower cholesterol levels and improves heart health. Oats also provide sustained energy, making them an excellent addition to your diet.
4. Natural Sweeteners: By using ripe bananas as a natural sweetener, you reduce the need for added sugars, thereby lowering the glycemic index of the bars. This can help maintain stable blood sugar levels throughout the day.
Incorporating Nutty Banana Bliss Bars into your diet promotes a balanced approach to snacking. They can help you avoid processed foods high in sugars and unhealthy fats, making them an excellent choice for maintaining energy levels and satiety throughout the day.
Conclusion
Nutty Banana Bliss Bars are a fantastic and nutritious snack option that can easily be integrated into your daily eating habits. Not only do they provide a satisfying sweetness and crunchy texture, but they also deliver a wealth of health benefits thanks to their wholesome ingredients.
By making these bars at home, you have control over what goes into your snacks, ensuring they are free from artificial additives and excessive sugars. Whether you enjoy them as a quick on-the-go snack, a healthy breakfast addition, or a delightful dessert alternative, these bars are sure to become a favorite in your household.
We encourage you to try this recipe, experiment with your favorite nuts and add-ins, and discover the delicious flavor and health benefits of Nutty Banana Bliss Bars. Remember, including healthy treats in your diet is essential for maintaining a balanced lifestyle, and these bars are a perfect way to indulge without compromising your well-being. Enjoy every bite!