No-Bake Oreo Cookie Dough Bars Recipe
In the ever-evolving world of desserts, no-bake recipes have carved out a beloved niche for themselves. With their simple preparation and delightful flavors, these treats have become a go-to choice for both novice bakers and seasoned confectioners alike. Among the myriad of no-bake options available, the No-Bake Oreo Cookie Dough Bars stand out as an irresistibly sweet indulgence that combines the iconic taste of Oreos with the creamy richness of cookie dough. This recipe is not just a treat; it’s a celebration of flavor and convenience, making it perfect for any occasion.
The allure of no-bake desserts lies in their simplicity. Imagine a dessert that requires no oven time, minimal equipment, and can be assembled in mere minutes. This is precisely what the No-Bake Oreo Cookie Dough Bars offer. Whether you’re hosting a last-minute gathering, craving a sweet snack, or looking to impress your friends with your baking prowess without the fuss, this recipe is your ticket to success. Suitable for all skill levels, these bars are so easy to whip up that even the youngest chefs can join in on the fun.
Understanding No-Bake Desserts
No-bake desserts are an innovative solution for those who love sweets but want to avoid the hassle of traditional baking. These treats are typically made using cold or room-temperature ingredients, eliminating the need for an oven. The appeal of no-bake desserts extends beyond just convenience; they allow for creativity and experimentation with flavors and textures.
One of the primary advantages of no-bake recipes is the significant time-saving benefit. With most recipes requiring only a few minutes of preparation, you can spend less time in the kitchen and more time enjoying your delicious creations. Additionally, no-bake desserts often result in minimal cleanup, as they require fewer dishes and utensils compared to their baked counterparts.
Versatility is another hallmark of no-bake desserts. From cheesecakes to bars and bites, the possibilities are endless. You can easily swap ingredients based on dietary preferences or seasonal availability. This flexibility makes no-bake recipes a favorite among home bakers who enjoy experimenting with flavors and textures.
Ingredients Breakdown
To create the No-Bake Oreo Cookie Dough Bars, you’ll need a carefully selected array of ingredients, each playing a vital role in achieving the perfect balance of flavor and texture.
1. Heat-Treated Flour: Safety is paramount when it comes to raw flour. By heat-treating the flour, you eliminate harmful bacteria that may be present. This process involves spreading the flour on a baking sheet and heating it in the oven for a short period. The result is safe-to-eat flour that retains its baking properties.
2. Butter: Unsalted butter is the backbone of the cookie dough base. It not only provides richness but also helps to create a creamy, decadent texture. Make sure your butter is softened to room temperature for easy mixing.
3. Sugars: A combination of granulated sugar and brown sugar adds depth to the flavor. Granulated sugar contributes sweetness, while brown sugar enhances the chewiness and introduces a hint of caramel flavor due to its molasses content.
4. Cream Cheese: To elevate the creaminess of the cookie dough, cream cheese is added. This ingredient gives the bars a smooth texture and a slight tang that balances the sweetness.
5. Vanilla Extract: A splash of vanilla extract is essential in baked goods, and it plays a similar role in no-bake desserts. It enhances the overall flavor profile, making every bite aromatic and delicious.
6. Mini Chocolate Chips: These little morsels of chocolate provide delightful bursts of sweetness and texture throughout the bars. Using mini chocolate chips ensures an even distribution, giving you a bit of chocolate in every bite.
7. Crushed Oreos: No Oreo dessert would be complete without the star ingredient. Crushed Oreos add a classic cookie crunch and rich chocolate flavor, making them an integral part of the recipe.
With these ingredients in hand, you’re ready to embark on the journey of creating No-Bake Oreo Cookie Dough Bars. The steps involved are straightforward, ensuring that even those with minimal baking experience can achieve delicious results.
Step-by-Step Instructions for No-Bake Oreo Cookie Dough Bars
Preparing the Flour Safely
The first step in making your No-Bake Oreo Cookie Dough Bars is to prepare the flour safely. This is a crucial part of the process, as it ensures that your dessert is safe to eat. To heat-treat the flour, preheat your oven to 350°F (175°C). Spread the desired amount of flour evenly on a baking sheet and bake for about 5-10 minutes, stirring halfway through to ensure even heating. Let it cool completely before using it in your recipe. This simple step transforms raw flour into a safe ingredient, allowing you to enjoy your cookie dough without any worries.
Mixing the Base
Once your flour is ready, it’s time to mix the base for your cookie dough. In a large mixing bowl, combine the softened butter, granulated sugar, and brown sugar. Using an electric mixer, cream the butter and sugars together on medium speed until the mixture is light and fluffy, which typically takes about 2-3 minutes. This step is vital, as it incorporates air into the mixture, resulting in a lighter texture for your cookie dough.
Enhancing Flavor with Vanilla Extract
Next, add in the vanilla extract. This ingredient is not just an afterthought; it plays a significant role in enhancing the overall flavor of your bars. Mix for an additional 30 seconds to ensure the vanilla is evenly distributed throughout the dough. The sweet, aromatic notes of vanilla will elevate the taste, making your bars even more enticing.
Incorporating the Flour
Now it’s time to incorporate the heat-treated flour into the mixture. Gradually add the flour to the butter-sugar mixture, mixing on low speed until just combined. Be careful not to overmix, as this can lead to a tough texture. The goal is to achieve a dough-like consistency that is soft and slightly sticky.
Folding in the Goodies
Finally, it’s time to fold in the goodies that make these bars truly special. Gently stir in the crushed Oreos and mini chocolate chips using a spatula or wooden spoon. This method ensures that the cookie pieces and chocolate chips are evenly distributed throughout the dough without breaking them down too much. The combination of Oreo crunch and chocolatey goodness will create a delicious contrast in every bite of your bars.
With these initial steps complete, you are well on your way to creating a batch of No-Bake Oreo Cookie Dough Bars that are sure to impress. The process is simple, straightforward, and incredibly rewarding, allowing you to enjoy a decadent dessert without the hassle of baking. As we continue, we’ll explore the final steps to set and serve your delicious creations. Stay tuned for the next part of this delectable journey!
{{image_2}}
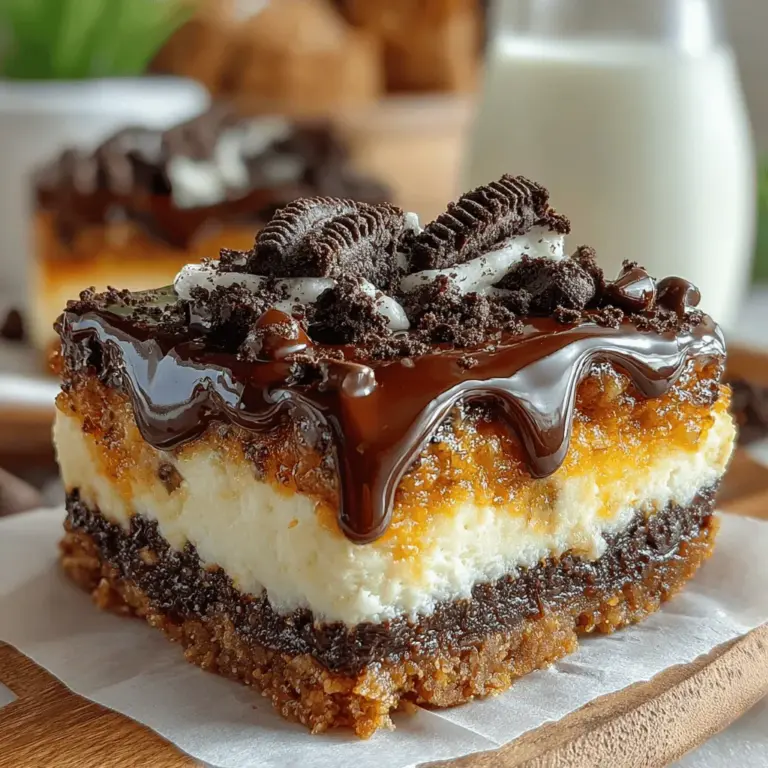
Importance of Evenly Distributing Chocolate Chips and Oreos for Balanced Flavor
Achieving the perfect balance of flavor and texture in your No-Bake Oreo Cookie Dough Bars hinges on the even distribution of chocolate chips and crushed Oreos throughout the mixture. When these ingredients are uniformly spread, every bite offers a delightful combination of rich chocolate and the signature cookie crunch. To effectively incorporate these elements, sprinkle the chocolate chips and crushed Oreos over the mixture after combining the base ingredients. Use a spatula to gently fold them in, ensuring that each portion of the bars is infused with that classic Oreo flavor.
Cream Cheese Integration
Cream cheese plays a pivotal role in the richness and creaminess of your No-Bake Oreo Cookie Dough Bars. Its smooth texture helps to bind the ingredients together while adding a velvety mouthfeel that elevates the bars to a new level of indulgence. When selecting cream cheese for this recipe, opt for block cream cheese instead of the spreadable kind; this will provide a firmer texture that is easier to work with. Allow the cream cheese to come to room temperature before mixing; this will facilitate a smoother blend with the other ingredients, ensuring that the bars maintain a creamy consistency.
Preparing the Baking Dish
To simplify the removal and cleanup process, preparing your baking dish with parchment paper is highly recommended. Line an 8×8 inch baking dish with parchment, leaving some overhang on the sides. This will allow you to easily lift the bars out once they are set. The parchment paper not only prevents sticking but also contributes to a clean-cut presentation when you slice the bars. If you do not have parchment paper, a light coating of cooking spray will also work, but parchment is preferable for its convenience.
Spreading and Pressing the Mixture
When it comes to spreading and pressing the cookie dough mixture into the prepared baking dish, technique is key. Start by dolloping the mixture into the dish, then use the back of a spatula to gently spread it out toward the corners. To ensure that the mixture holds together, it’s essential to apply even pressure while pressing it down firmly but not aggressively. A slight rocking motion can help compact the mixture without overworking the dough, which could affect the final texture of the bars. The goal is to create a uniform layer that is both dense and cohesive, which will hold up beautifully once chilled.
Chilling Process
Refrigeration is a crucial step in the process of making No-Bake Oreo Cookie Dough Bars. Placing the bars in the refrigerator for at least 2 hours allows them to set properly, giving them a firm structure that makes cutting and serving easier. The chilling process also enhances the flavors as they meld together, resulting in a more cohesive taste experience. For best results, cover the dish with plastic wrap or a lid during chilling to prevent any odors from other foods in the fridge from permeating the bars.
Optional Chocolate Drizzle
For an added touch of elegance and flavor, consider incorporating a chocolate drizzle on top of your bars. To do this, melt semi-sweet or dark chocolate in a microwave-safe bowl, heating in 30-second intervals and stirring until smooth. Once melted, transfer the chocolate to a piping bag or a small zip-top bag with a corner snipped off. Drizzle the chocolate over the chilled bars in a zigzag pattern for an aesthetically pleasing finish that elevates the presentation. This not only enhances the visual appeal but also adds a rich chocolate layer that complements the Oreo flavor perfectly.
Adding Toppings
To take the texture and presentation of your No-Bake Oreo Cookie Dough Bars to the next level, consider adding some additional crushed Oreos on top before serving. Not only do they provide a delightful crunch, but they also enhance the overall Oreo experience. Simply crush a few Oreos into coarse pieces and sprinkle them generously over the melted chocolate drizzle. This final touch not only makes the bars look more inviting but also reinforces that beloved cookie flavor in every bite.
Cutting and Serving Suggestions
When it comes time to cut and serve your No-Bake Oreo Cookie Dough Bars, a few tips can ensure clean, attractive slices. Start by using a sharp knife that has been warmed under hot water; this will help glide through the chilled bars without crumbling. Wipe the knife clean between cuts to maintain neat edges. For serving, you can place the bars on a decorative platter, or wrap them individually in parchment or wax paper for a fun, grab-and-go treat. Consider pairing the bars with milk, coffee, or a scoop of ice cream for an indulgent dessert experience that’s sure to impress.
Nutritional Information
When indulging in No-Bake Oreo Cookie Dough Bars, it’s important to be mindful of the nutritional content. Each serving typically contains approximately 200 calories, with a balance of carbohydrates, fats, and proteins. While these treats are certainly indulgent, enjoying them in moderation allows you to savor their deliciousness without overdoing it. The richness of the cream cheese and the sweetness of the cookies create a satisfying dessert option that can be part of a balanced diet if enjoyed occasionally.
Pairing Ideas
These No-Bake Oreo Cookie Dough Bars are versatile and can be served at various occasions. For casual get-togethers, pair them with a cup of coffee or hot chocolate for a cozy treat. They also make a delightful addition to dessert tables at birthday parties, where they can be served alongside other sweets. Consider complementing them with a scoop of vanilla ice cream or whipped cream for an extra decadent experience. If you’re hosting a summer gathering, a chilled glass of milk or a refreshing iced tea can be the perfect beverage pairing.
Conclusion
In summary, No-Bake Oreo Cookie Dough Bars are an easy and delicious dessert option that combines the beloved flavors of Oreo cookies with a creamy, indulgent base. From the importance of evenly distributing chocolate chips and Oreos to the key role of cream cheese and the benefits of using parchment paper, each step contributes to the delightful outcome of this recipe. Whether you choose to drizzle chocolate or sprinkle additional crushed Oreos on top, these bars are sure to impress friends and family alike. Enjoy the satisfaction of creating a homemade treat without the hassle of baking, and make these bars a go-to dessert for any occasion.
