Introduction to No-Bake Cookie Dough Cups
In the realm of desserts, cookie dough has carved out a special place in the hearts of many. Its rich and sweet flavor, coupled with a satisfying chewy texture, makes it an irresistible treat. Traditionally enjoyed raw, cookie dough often raises concerns about food safety due to the presence of raw eggs and flour. However, what if there was a way to indulge in that beloved taste without the risks? This is where No-Bake Cookie Dough Cups come into play.
These delightful, bite-sized treats allow you to savor the classic taste of cookie dough without the need for baking. Made with simple, wholesome ingredients, No-Bake Cookie Dough Cups are not only easy to whip up but also cater to those seeking a guilt-free dessert option. Whether you’re a busy parent looking for a quick sweet fix or someone who enjoys experimenting in the kitchen, this recipe is perfect for satisfying your sweet cravings without the fuss of traditional baking.
In this article, we will delve into the essential ingredients that make up these cookie dough cups, followed by a detailed step-by-step guide on how to prepare them. We will also share tips on presentation to ensure your dessert stands out.
Understanding the Ingredients
To create the perfect No-Bake Cookie Dough Cups, it’s essential to understand the role of each ingredient. This recipe utilizes a blend of gluten-free flours, natural sweeteners, and rich flavorings to achieve a delightful cookie dough experience.
Exploring the Base Ingredients
1. Almond Flour: This gluten-free alternative not only serves as a base for the cookie dough but also adds a subtle nutty flavor. Almond flour is packed with nutrients, including healthy fats and protein, making it a great choice for those looking to create a more wholesome dessert.
2. Coconut Flour: While almond flour provides a rich base, coconut flour contributes to the overall texture. It is low in carbohydrates and high in fiber, making it an excellent addition for those following a low-carb or gluten-free diet. Just a small amount goes a long way, as coconut flour absorbs moisture and helps bind the ingredients together.
3. Maple Syrup or Agave Syrup: Instead of refined sugars, this recipe calls for natural sweeteners like maple syrup or agave syrup. These options not only add sweetness but also provide moisture to the dough. Their unique flavors elevate the overall taste, making each bite more enjoyable.
4. Coconut Oil: This ingredient adds richness to the cookie dough and acts as a binding agent. When melted, coconut oil helps to create a smooth and cohesive dough, ensuring that all the ingredients combine beautifully.
5. Vanilla Extract: A staple in many dessert recipes, vanilla extract enhances the flavor profile of the cookie dough, adding depth and warmth to each bite.
6. Salt: Though often overlooked, salt plays a crucial role in balancing sweetness. A pinch of salt enhances the flavors of the other ingredients and brings out the deliciousness of the cookie dough.
Incorporating the Chocolate
No cookie dough is complete without chocolate! To elevate these No-Bake Cookie Dough Cups, you’ll need to add chocolate in two forms:
– Mini Chocolate Chips: These tiny morsels of chocolate provide bursts of flavor and texture throughout the cookie dough. Their small size ensures an even distribution, making every bite equally delightful.
– Dark or Milk Chocolate Chips: Used for coating the cups, chocolate chips create a decadent finish. The choice between dark or milk chocolate allows for customization based on your preference—dark chocolate offers a rich, slightly bitter contrast, while milk chocolate provides a creamier sweetness.
Optional Toppings for Extra Flavor
To personalize your No-Bake Cookie Dough Cups, consider adding optional toppings. Crushed nuts can introduce a satisfying crunch, while a sprinkle of sea salt can enhance the overall flavor. For a touch of fun, colorful sprinkles can add visual appeal, making these treats perfect for parties or special occasions.
Step-by-Step Instructions for No-Bake Cookie Dough Cups
Now that we’ve covered the essential ingredients, let’s move on to the preparation process. Making No-Bake Cookie Dough Cups is straightforward, and with a few simple steps, you’ll have a delicious treat ready to enjoy.
Preparing the Cookie Dough Mixture
1. Mixing the Dry Ingredients: In a mixing bowl, start by combining the almond flour and coconut flour. Use a whisk to ensure that the flours are well blended. This step is crucial as it ensures an even distribution of flavors and textures in the final dough.
2. Incorporating Sweeteners and Coconut Oil: Next, add in your choice of maple syrup or agave syrup, along with melted coconut oil. Mix these wet ingredients into the dry mixture until you achieve a cohesive dough. If the dough appears too dry, you can adjust by adding a little more syrup or coconut oil, one teaspoon at a time, until the desired consistency is reached.
3. Adding Vanilla and Salt: Stir in the vanilla extract and a pinch of salt. These ingredients will elevate the flavor of your cookie dough, balancing the sweetness and enhancing the overall taste.
4. Incorporating the Chocolate Chips: Finally, fold in the mini chocolate chips until they are evenly distributed throughout the dough. This step is important for ensuring that each cup is filled with delightful bursts of chocolate.
Molding the Cookie Dough Cups
1. Preparing Muffin Tins: To create the cookie dough cups, line a muffin tin with cupcake liners. This not only aids in easy removal but also provides a neat presentation for your treats. If you prefer, you can also use silicone molds, which are perfect for easy release.
2. Forming the Cups: Take a small amount of the cookie dough mixture and press it into the bottom of each muffin liner, creating a base layer. Then, use your fingers to press the dough up the sides of the liner, forming a cup shape. Ensure that the walls are thick enough to hold the filling later on, but not so thick that they become overwhelming.
3. Setting the Cups: Once all muffin liners are filled, place the muffin tin in the refrigerator for about 30 minutes. This chilling time allows the dough to firm up, making it easier to fill and giving it the perfect texture.
With these initial steps, you are well on your way to creating your No-Bake Cookie Dough Cups. In the next section, we will cover the final touches, including filling the cups with chocolate and any additional toppings you’d like to add. Stay tuned for more deliciousness ahead!
{{image_2}}
Making the Chocolate Coating
To achieve a luxurious coating for your no-bake cookie dough cups, the chocolate must be melted carefully to ensure a smooth, glossy finish. Start by selecting high-quality chocolate, whether it’s dark, milk, or a dairy-free alternative to suit your preferences.
Melting the Chocolate
1. Chop the Chocolate: Begin by finely chopping your chocolate into uniform pieces. This ensures that it melts evenly and quickly. If using chocolate chips, you can skip this step, though chopping will still help in achieving a smoother texture.
2. Double Boiler Method: Fill a saucepan with a few inches of water and bring it to a simmer. Place a heatproof bowl over the saucepan, making sure the bottom of the bowl does not touch the water. Add the chopped chocolate to the bowl. Stir gently as the chocolate melts, ensuring it doesn’t burn.
3. Microwave Method: Alternatively, you can melt the chocolate in the microwave. Place the chopped chocolate in a microwave-safe bowl and heat in 30-second intervals, stirring in between until completely melted and smooth.
4. Add a Fat: For an even silkier texture, consider adding a teaspoon of coconut oil or vegetable oil to the chocolate. This will help the coating to set better and provide a nice sheen.
Once your chocolate is melted and creamy, you are ready to assemble your cookie dough cups.
Assembling the Cookie Dough Cups
With your chocolate ready, it’s time to layer the flavors and textures that will make up your delightful cookie dough cups.
Step-by-Step Assembly
1. Prepare the Mold: Use a silicone muffin tray or cupcake liners for easy removal. If using a metal tray, consider lightly greasing it to prevent sticking.
2. First Layer of Chocolate: Pour a small amount of melted chocolate into each cup, just enough to cover the bottom (approximately 1 tablespoon). Use a spoon to spread the chocolate evenly along the sides, creating a shell. Tap the tray gently on the counter to eliminate any air bubbles that may have formed.
3. Chill to Set: Place the tray in the refrigerator for about 10-15 minutes, or until the chocolate has hardened.
4. Add Cookie Dough: Once the chocolate base has set, remove the tray from the fridge. Take your prepared cookie dough mixture and scoop about 1-2 tablespoons into each cup, pressing down gently to ensure it fills the space without gaps.
5. Top with Chocolate: Pour another layer of melted chocolate over the cookie dough filling, enough to cover it completely. Again, tap the tray to release any air bubbles and ensure an even coating.
6. Final Chill: Return the assembled cookie dough cups to the refrigerator for at least 30-45 minutes, allowing the chocolate to set completely.
Chilling for Perfection
Chilling is a crucial step in the preparation of no-bake cookie dough cups. The cooling process not only solidifies the chocolate but also helps the flavors meld together. If you’re short on time, you can place the tray in the freezer for about 15-20 minutes, but be cautious not to freeze them for too long, as this can alter the texture.
Presentation and Serving Suggestions
Creating an inviting display for your no-bake cookie dough cups will enhance their appeal and make them perfect for entertaining.
Tips for Arranging the Cookie Dough Cups
1. Choose the Right Plate: Select a decorative serving plate or platter that complements the colors of the cookie dough cups. A simple white plate can make the treats stand out beautifully.
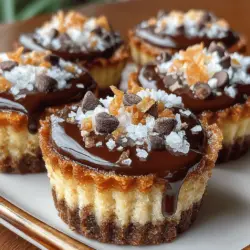
2. Garnishing Options: Consider garnishing each cup with additional chocolate chips, crushed nuts, or colorful sprinkles. This not only adds visual interest but also enhances texture and flavor. For a touch of elegance, you can drizzle some melted chocolate over the top of each cup before serving.
3. Add Fresh Elements: You can also include fresh fruits like berries or mint leaves around the cookie dough cups for a refreshing contrast. This adds both color and a hint of freshness to your presentation.
4. Serving Temperature: These cookie dough cups can be served straight from the fridge for a firm texture or left at room temperature for a softer bite, depending on your preference.
Nutritional Benefits of No-Bake Cookie Dough Cups
As you indulge in these delicious no-bake cookie dough cups, it’s worth noting the healthier ingredients that set this recipe apart from traditional cookie dough desserts.
Analyzing the Healthier Ingredients
1. Almond and Coconut Flour: By using almond flour and coconut flour instead of traditional all-purpose flour, you are not only making these treats gluten-free but also adding nutritional benefits. Almond flour is rich in healthy fats, protein, and vitamin E, while coconut flour is high in fiber and low in carbs, making them a great choice for many diets.
2. Natural Sweeteners: This recipe utilizes natural sweeteners like maple syrup or agave nectar instead of refined sugars. Natural sweeteners provide trace minerals and a lower glycemic index, making them a healthier option for sweetening without the sugar crash.
Addressing Dietary Considerations
These no-bake cookie dough cups cater to various dietary needs:
– Gluten-Free: With the use of gluten-free flours, these treats can be enjoyed by those with gluten sensitivities or celiac disease.
– Vegan: By using plant-based ingredients and natural sweeteners, these cookie dough cups fit perfectly into a vegan lifestyle.
– Allergy-Friendly: Adjustments can be made to accommodate nut allergies by substituting almond flour with sunflower seed flour or oat flour, making these treats accessible to a wider audience.
Why No-Bake Recipes are Ideal for Every Occasion
No-bake recipes like these cookie dough cups are not just convenient; they are perfect for any occasion, whether it’s a casual snack or a festive dessert.
The Convenience of No-Bake Desserts
1. Quick Prep Time: These cookie dough cups require minimal preparation and no baking time, making them ideal for those busy days when you want a sweet treat but lack the time to bake. In less than an hour, you can have a delectable dessert ready to chill.
2. Minimal Cooking Skills Required: Even novice cooks can master this recipe, as it involves simple steps that don’t require advanced culinary techniques. The straightforward nature of no-bake recipes makes them accessible and enjoyable for everyone.
Versatility in Flavor Combinations
One of the best aspects of no-bake cookie dough cups is their adaptability. You can easily customize the recipe to match your flavor preferences or dietary needs.
– Mix-Ins: Consider adding ingredients like shredded coconut, dried fruits, or different types of nut butters to the cookie dough for added flavor and texture.
– Toppings: Experiment with various toppings such as crushed cookies, caramel drizzle, or even a sprinkle of sea salt for a sweet and salty combination.
– Flavor Variations: Try incorporating extracts like vanilla, almond, or even espresso powder to create unique flavor profiles that elevate the traditional cookie dough experience.
Conclusion: Enjoying the Delight of No-Bake Cookie Dough Cups
No-Bake Cookie Dough Cups offer a modern twist to a classic favorite, combining convenience with indulgence. With their rich flavors and satisfying textures, these treats are sure to impress friends and family alike. Whether you enjoy them as a post-dinner dessert or a midday snack, these cookie dough cups are a delightful way to satisfy your sweet cravings without the need for baking.
Embrace the ease and joy of no-bake desserts and treat yourself to these delicious cups today. Perfect for gatherings, special occasions, or simply a moment of self-indulgence, these cookie dough cups are sure to become a cherished recipe in your collection. Enjoy every bite and share the joy with your loved ones!