No-Bake Cookie Dough Bliss Balls Recipe
In recent years, no-bake desserts have surged in popularity, captivating the hearts of dessert lovers and health-conscious eaters alike. The allure of these treats lies in their simplicity and convenience—there’s no need for an oven, which often means less mess and faster preparation. Among the myriad of no-bake options, No-Bake Cookie Dough Bliss Balls stand out as a particularly enticing choice. These delightful snacks are not only easy to make but also provide a healthy alternative to traditional cookie dough, allowing you to indulge without the guilt.
No-Bake Cookie Dough Bliss Balls are a versatile and satisfying treat that can be customized to your taste preferences. Whether you’re a fan of rich chocolate, nutty flavors, or fruity bursts, this recipe can accommodate it all. The base is wholesome and nutritious, incorporating ingredients that provide energy and essential nutrients. With just a few simple steps, you can whip up a batch of these blissful bites to enjoy at home or on the go.
One of the most appealing aspects of this recipe is its flexibility. You can easily tailor the ingredients to suit your dietary preferences or restrictions. Whether you’re vegan, gluten-free, or simply looking for a way to sneak in healthier choices, there’s a variation of these bliss balls that’s perfect for you. The main ingredients—oats and nut butter—are not only delicious but also packed with nutritional benefits that make these treats a smart choice for any snack time.
Understanding the Ingredients
To truly appreciate the magic of No-Bake Cookie Dough Bliss Balls, it’s essential to understand the role of each ingredient in the recipe. Let’s break down the key components and their contributions to this delicious treat.
Rolled Oats
Rolled oats serve as the foundation of our bliss balls, providing texture, structure, and a wealth of nutritional benefits. Rich in fiber, oats promote digestive health and help keep you feeling full longer. They are also a great source of complex carbohydrates, which provide sustained energy throughout the day. Additionally, oats contain essential vitamins and minerals, including iron, magnesium, and B vitamins, making them a wholesome choice for any snack.
Almond Flour vs. All-Purpose Flour
When it comes to choosing a flour for your bliss balls, almond flour is a popular option that offers a range of health benefits compared to traditional all-purpose flour. Almond flour is lower in carbohydrates and higher in healthy fats, protein, and fiber. This makes it a fantastic choice for those looking to reduce their carb intake or for anyone following a gluten-free diet. The nutty flavor of almond flour also adds a delightful richness to the bliss balls, enhancing their overall taste.
Conversely, all-purpose flour can be used if you prefer a more neutral flavor, but it lacks the nutritional punch that almond flour provides. If you’re looking to maximize the health benefits of your treats, almond flour is the way to go.
Peanut Butter vs. Almond Butter
Nut butter is a crucial ingredient that not only binds the mixture but also adds a creamy texture and rich flavor. Both peanut butter and almond butter are excellent choices, but they each have their unique characteristics. Peanut butter is typically creamier and has a slightly sweeter taste, making it a favorite among many. It is also a good source of protein and healthy fats, supporting muscle health and overall well-being.
On the other hand, almond butter offers a milder flavor profile and is packed with additional vitamins and minerals, including vitamin E, which is known for its antioxidant properties. Choosing between peanut butter and almond butter comes down to personal preference, and you can even experiment with other nut butters like cashew or sunflower seed butter for a different twist.
Sweeteners: Honey vs. Maple Syrup
Natural sweeteners play a pivotal role in achieving the desired sweetness of our bliss balls. Honey and maple syrup are two popular options, each with its own set of benefits. Honey, being a natural humectant, not only sweetens but also helps retain moisture, keeping your bliss balls deliciously chewy. It also boasts antimicrobial properties and can provide a quick energy boost.
Maple syrup, on the other hand, adds a unique flavor that complements the nutty and sweet elements of the recipe. It is rich in antioxidants and has a lower glycemic index than regular sugar, making it a slightly better option for those mindful of their blood sugar levels. Whichever sweetener you choose, make sure it is pure and unprocessed to reap the full benefits.
The Importance of Vanilla Extract and Cinnamon
Flavor enhancement is critical in any dessert, and vanilla extract and cinnamon are two powerhouse ingredients that elevate the taste of No-Bake Cookie Dough Bliss Balls. Vanilla extract adds a warm and inviting aroma, while also balancing the sweetness of the other ingredients. It has been shown to have calming effects, making your bliss balls not just tasty but also comforting.
Cinnamon, with its warm and spicy notes, not only enhances the flavor but also offers health benefits, including anti-inflammatory properties and potential blood sugar regulation. A pinch of cinnamon can transform your bliss balls from merely delicious to truly unforgettable.
The Role of Sea Salt in Balancing Flavors
While it may seem counterintuitive to add salt to a sweet treat, a pinch of sea salt can significantly enhance the overall flavor profile of your bliss balls. Salt helps to balance sweetness and accentuate the other flavors, creating a more complex and satisfying taste. Additionally, sea salt contains trace minerals that can contribute to better health, making it a worthy addition to your ingredient list.
Add-Ins: Versatility of Mix-Ins
One of the most exciting aspects of No-Bake Cookie Dough Bliss Balls is the variety of mix-ins you can incorporate to create a personalized treat. Chocolate chips, dried fruits, nuts, and seeds are just a few options that can take your bliss balls to the next level. For a classic flavor, semi-sweet or dark chocolate chips add richness and indulgence. If you prefer a fruity twist, consider adding dried cranberries or apricots for a burst of sweetness and texture.
Nuts and seeds not only provide an extra crunch but also boost the nutritional value of your snack. Chopped almonds, walnuts, sunflower seeds, or chia seeds can enhance the protein and fiber content while adding healthy fats. The possibilities are endless, allowing you to create a unique blend that suits your taste preferences.
Step-by-Step Instructions
Now that we’ve covered the essential ingredients and their roles, let’s dive into the step-by-step instructions for making No-Bake Cookie Dough Bliss Balls. The process is straightforward, ensuring that even novice bakers can achieve delicious results with ease.
Mixing the Dry Ingredients
Begin by gathering your dry ingredients, which typically include rolled oats, almond flour, and any additions such as cinnamon or sea salt. The key to achieving the right texture in your bliss balls is to thoroughly mix these dry components. This ensures that each bite is evenly flavored and that the ingredients bind together seamlessly.
When measuring your dry ingredients, it’s important to use the correct technique. For rolled oats, spoon them into your measuring cup and level off with a knife for accuracy. For almond flour, ensure it’s fluffed up before scooping to avoid packing it down, which can lead to using more flour than intended.
Combining the Wet Ingredients
Next, move on to the wet ingredients, which include your chosen nut butter, sweetener, and vanilla extract. In a separate bowl, combine these ingredients and mix well until smooth and lump-free. If you’re using natural nut butters, you may need to stir them vigorously to achieve a creamy consistency. This step is crucial as it ensures that the nut butter blends well with the sweetener and other flavors, contributing to a cohesive mixture.
Bringing It All Together
Once your dry and wet ingredients are prepared, it’s time to bring them together. Pour the wet mixture into the bowl containing the dry ingredients and stir thoroughly until everything is well combined. The goal is to achieve a dough-like consistency that holds together without being too sticky or crumbly. If the mixture seems too dry, you can add a touch more nut butter or sweetener; if it’s too wet, a sprinkle of almond flour or oats can help balance it out.
This stage is where you can also fold in any desired mix-ins, ensuring they are evenly distributed throughout the dough. Once you have the perfect consistency, it’s time to form your bliss balls.
In the next section, we will cover the final steps to shape and set your No-Bake Cookie Dough Bliss Balls, along with some serving suggestions to enjoy this delightful treat.
{{image_2}}
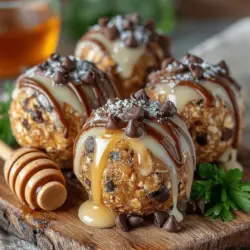
No-Bake Cookie Dough Bliss Balls are a delightful, healthy snack that captures the essence of cookie dough without the need for baking. These little bites of joy are not only easy to make but can also be customized to suit your taste preferences. In this section, we will focus on the essential steps to ensure your bliss balls are perfectly shaped and flavored, along with serving suggestions and the nutritional benefits of the ingredients used.
Importance of Ensuring a Sticky Yet Moldable Dough
When crafting your No-Bake Cookie Dough Bliss Balls, achieving the right texture is crucial. The dough should be sticky enough to hold together when rolled but not so wet that it falls apart. To ensure this balance, follow these key tips:
1. Ingredient Ratios: Use a blend of oats, nut butter, and sweeteners in precise ratios. The oats provide structure, the nut butter adds moisture, and the sweetener binds everything together. If your mixture appears too dry, consider adding a splash of non-dairy milk or an extra spoonful of nut butter.
2. Testing Consistency: After mixing your ingredients, take a small amount of the dough and press it between your fingers. If it holds together without crumbling, you’re on the right track. If it’s too crumbly, add more liquid gradually until you reach the desired consistency.
Incorporating Flavorful Add-Ins
One of the best parts of making No-Bake Cookie Dough Bliss Balls is the opportunity for personalization through mix-ins. While chocolate chips are a classic choice, there are several other flavorful ingredients you can incorporate into your dough:
Suggestions for Creative Mix-Ins Beyond Chocolate Chips
1. Nuts and Seeds: Chopped almonds, walnuts, or sunflower seeds add a delightful crunch and nutritional boost.
2. Dried Fruits: Consider adding raisins, cranberries, or chopped apricots for a touch of sweetness and chewy texture.
3. Coconut Flakes: Unsweetened coconut adds a tropical flavor and pairs beautifully with chocolate or vanilla.
4. Spices: Cinnamon, nutmeg, or even a dash of cayenne can elevate the flavor profile of your bliss balls.
How to Evenly Distribute Mix-Ins for a Balanced Flavor in Every Bite
To ensure that each bliss ball is evenly flavored, follow these steps:
– Fold Gently: After adding your mix-ins to the dough, gently fold them in rather than stirring vigorously. This method helps distribute the ingredients without breaking them apart.
– Use Visual Cues: Aim for a uniform color and texture throughout the dough. If you notice certain areas are denser with mix-ins, continue to fold until the distribution appears consistent.
Shaping the Bliss Balls
Once your dough is well-mixed and ready to go, it’s time to shape those bliss balls!
Techniques for Rolling the Dough into Uniform Balls
1. Scoop and Roll: Use a cookie scoop or tablespoon to portion out the dough. This ensures each ball is the same size, which helps with even chilling and presentation.
2. Wet Hands: Lightly wet your hands with water or oil before rolling the dough into balls. This will prevent sticking and help form smooth, round shapes.
The Importance of Using Parchment Paper to Prevent Sticking
To make the process smoother, line a baking sheet or plate with parchment paper before placing your rolled bliss balls on it. This not only makes for easy removal but also helps the bliss balls maintain their shape while chilling.
Chilling for Perfection
Chilling is a critical step in the creation of your No-Bake Cookie Dough Bliss Balls. It enhances both texture and flavor, making your snacks even more enjoyable.
Discuss the Significance of Refrigeration in Enhancing Texture and Flavor
Chilling the bliss balls allows the flavors to meld together, resulting in a cohesive taste experience. Additionally, it firms up the nut butter and sweetener mixture, making the bliss balls easier to bite into and chew.
Recommended Chilling Time and How It Affects the Final Product
For best results, refrigerate your bliss balls for at least 30 minutes. This time allows them to set properly. If you prefer a firmer texture, consider chilling them for up to two hours. Once done, you’ll find that they hold their shape beautifully and are ready to enjoy!
Serving Suggestions
No-Bake Cookie Dough Bliss Balls are versatile and can be enjoyed in various ways. Here are some serving ideas to enhance your snacking experience:
Ideas for Serving the Bliss Balls
1. Pairing with Beverages: These bliss balls complement a range of beverages. Try pairing them with a warm cup of tea, a refreshing iced coffee, or even a smoothie for a satisfying snack.
2. Garnishing with Sea Salt: For an enticing sweet-salty twist, sprinkle a pinch of sea salt on top of the bliss balls before serving. This contrast enhances the overall flavor and adds a gourmet touch.
3. Occasions for Enjoyment: These bliss balls are perfect for various occasions. Use them as a quick snack during busy days, serve them at parties as a healthy treat, or prepare them in advance for meal prep throughout the week.
Nutritional Benefits
Understanding the nutritional benefits of the ingredients used in your No-Bake Cookie Dough Bliss Balls can enhance your appreciation for this healthy treat.
Overview of the Health Benefits of the Ingredients Used in the Bliss Balls
1. Oats: A fantastic source of fiber, oats help to keep you full and satisfied. They also support heart health and can aid in digestion.
2. Nut Butters: Nut butters, such as almond or peanut butter, provide healthy fats and protein, making your bliss balls a more filling snack. They also contain essential vitamins and minerals.
3. Natural Sweeteners: Using natural sweeteners like maple syrup or honey not only adds sweetness but also offers antioxidants and nutrients that refined sugars lack.
The Role of Oats in a Balanced Diet
Incorporating oats into your diet can lead to numerous health benefits, including improved cholesterol levels and better blood sugar control. They are a great complex carbohydrate source, providing lasting energy without the crash associated with simple sugars.
Nutritional Advantages of Nut Butters
Nut butters are rich in monounsaturated fats, which are heart-healthy. They can help lower bad cholesterol levels and are packed with protein, making them an excellent addition to snacks and meals.
Discussion on the Benefits of Natural Sweeteners
Natural sweeteners provide a more nutritious alternative to refined sugars. They often contain vitamins, minerals, and antioxidants, contributing to overall health while satisfying your sweet tooth.
Conclusion
In summary, No-Bake Cookie Dough Bliss Balls are a simple, versatile, and nutritious snack option for those looking to indulge without the guilt. With the ease of preparation and the ability to customize flavors, these bliss balls are perfect for anyone on a busy schedule or looking to enjoy homemade treats.
We encourage you to experiment with different flavors and mix-ins to create your perfect bliss ball. Enjoy the process of making these delightful snacks and share the joy of homemade goodies with family and friends. With their health benefits and delicious taste, these bliss balls are sure to become a staple in your recipe collection.