Frozen Yogurt Cherry Cheesecake Slices: A Refreshing Dessert Delight
When the sun shines bright and the temperature rises, nothing beats the allure of a cool, refreshing dessert. Enter Frozen Yogurt Cherry Cheesecake Slices—a delightful treat that perfectly balances the creamy richness of cheesecake with the tangy sweetness of cherries. This recipe is not just a seasonal indulgence; it’s a versatile dessert that can elevate any summer gathering, family celebration, or casual afternoon snack. With its easy prep, no-bake requirement, and customization options, this frozen delight is sure to please both your taste buds and your health-conscious side.
The Appeal of Frozen Desserts
As the warmer months approach, frozen desserts become a staple in many households. They offer a way to cool down while satisfying a sweet tooth without the guilt often associated with traditional desserts. Frozen Yogurt Cherry Cheesecake Slices stand out in this category due to their yogurt base, which provides a lighter alternative to the heavier cream cheese varieties. Yogurt lends not only a creamy texture but also a lower fat content, making it a more health-conscious choice. Plus, the probiotics found in yogurt can contribute positively to gut health, adding a nutritional boost to your indulgence.
Cherries, the star of this recipe, bring a burst of flavor and a wealth of health benefits. Rich in antioxidants, vitamins, and minerals, cherries not only enhance the taste profile of the cheesecake slices but also provide a natural sweetness that complements the tangy yogurt beautifully. Their vibrant color and juicy texture make them an irresistible topping that elevates the overall presentation of the dessert.
Ingredients Breakdown
To create these delectable Frozen Yogurt Cherry Cheesecake Slices, you will need a handful of carefully selected ingredients. Each plays a crucial role in ensuring the final product is both delicious and satisfying.
Crust Ingredients
1. Granola or Graham Cracker Crumbs: The crust serves as the foundation of your cheesecake slices, providing a crunchy texture that contrasts beautifully with the creamy filling. Granola adds a wholesome touch, often rich in fiber and healthy fats, while graham cracker crumbs offer a classic cheesecake flavor. You can choose based on your personal preference or dietary needs.
2. Unsweetened Shredded Coconut: Adding shredded coconut not only enhances the flavor but also contributes to the texture of the crust. Coconut is a source of healthy fats and fiber, making it a nutritious addition that helps keep you feeling full.
3. Butter: This ingredient acts as a binding agent, helping to hold your crust together. It adds a rich flavor that complements the sweetness of the other ingredients. For a healthier option, consider using coconut oil or a dairy-free alternative.
4. Maple Syrup: A natural sweetener, maple syrup provides a subtle sweetness that enhances the flavor of your crust without overwhelming it. It’s also packed with minerals and antioxidants, making it a more nutritious choice compared to refined sugars.
Cheesecake Layer Ingredients
1. Plain Greek Yogurt: The star of the cheesecake layer, Greek yogurt is a healthier alternative to traditional cream cheese. It offers a creamy texture while being lower in fat and higher in protein. This ingredient not only contributes to the overall flavor but also adds nutritional value, making your dessert a guilt-free treat.
2. Powdered Sugar: Used sparingly, powdered sugar sweetens the cheesecake layer without adding grittiness. It dissolves easily, ensuring a smooth and creamy texture that is essential for a successful cheesecake.
3. Vanilla Extract: This ingredient enhances the overall flavor of the cheesecake, providing a warm, aromatic essence that complements the other components perfectly.
4. Lemon Juice: A splash of lemon juice brightens the flavors of the cheesecake layer, adding a refreshing tang that balances the sweetness of the sugar. It’s a key player in creating a well-rounded dessert that’s not overly rich.
Cherry Topping Ingredients
1. Fresh vs. Frozen Cherries: Both options can be used, depending on availability and preference. Fresh cherries offer a juicy burst of flavor and a beautiful presentation, while frozen cherries can be more convenient and equally delicious. Both are packed with vitamins, minerals, and antioxidants that promote overall health.
2. Sugar: A modest amount of sugar helps to enhance the natural sweetness of the cherries, creating a luscious topping that contrasts with the tartness of the yogurt.
3. Cornstarch: This ingredient is essential for thickening the cherry topping, ensuring that it clings nicely to the cheesecake slices. It helps create a glossy finish that adds to the visual appeal of the dessert.
4. Lemon Juice: Just as in the cheesecake layer, a touch of lemon juice in the cherry topping brightens the flavor, ensuring that the topping is not overly sweet and perfectly complements the creamy base.
Initial Steps to Prepare Frozen Yogurt Cherry Cheesecake Slices
With your ingredients ready, it’s time to dive into the preparation of your Frozen Yogurt Cherry Cheesecake Slices. The process is straightforward and requires minimal effort, making it an ideal recipe for both novice cooks and experienced bakers alike.
1. Prepare the Crust: Start by combining your chosen granola or graham cracker crumbs with shredded coconut in a mixing bowl. Add melted butter and maple syrup, mixing until the crumbs are evenly coated. Press this mixture firmly into the bottom of a lined baking dish to create an even layer. This step is crucial, as a well-formed crust will hold up during slicing and serving.
2. Make the Cheesecake Layer: In a separate bowl, blend the plain Greek yogurt, powdered sugar, vanilla extract, and lemon juice until smooth and creamy. This layer should be light yet flavorful, offering a perfect balance to the crust and cherry topping.
3. Assemble the Layers: Once the crust is set, pour the cheesecake mixture over the crust, spreading it evenly to ensure each slice has a generous filling. Smooth the top with a spatula for an aesthetically pleasing finish.
4. Prepare the Cherry Topping: In a saucepan over medium heat, combine your cherries with sugar, cornstarch, and lemon juice. Cook until the mixture thickens and the cherries release their juices, creating a vibrant topping that will be spooned over the cheesecake layer.
5. Chill and Freeze: After preparing the cherry topping, let it cool slightly before spreading it over the cheesecake layer. Cover the baking dish and place it in the freezer. Allow it to freeze for several hours or until firm, making it easy to slice into perfect portions.
With these initial steps, you’re well on your way to creating a refreshing and indulgent dessert that is sure to impress your guests or provide a healthy sweet treat for yourself. Stay tuned for the next part of the article, where we will explore serving suggestions, storage tips, and creative variations to make this Frozen Yogurt Cherry Cheesecake Slices recipe your own.
{{image_2}}
Step-by-Step Instructions for Frozen Yogurt Cherry Cheesecake Slices
Creating the perfect Frozen Yogurt Cherry Cheesecake Slices involves several steps that ensure a delightful treat full of flavor and texture. Follow these instructions carefully to achieve the best results.
Preparing the Crust
1. Choose Your Base: Begin by selecting your crust ingredients. Traditional cheesecake often uses graham crackers, but feel free to experiment with Oreo cookies or almond flour for a gluten-free option.
2. Crushing the Ingredients: If using graham crackers, place them in a food processor and pulse until you achieve fine crumbs. If you’re opting for cookies, crush them in a resealable plastic bag with a rolling pin.
3. Mixing with Butter: In a mixing bowl, combine the crushed crumbs with melted butter. The mixture should hold together when pressed. Start with about 1/2 cup of melted butter for every 1 ½ cups of crumbs.
4. Pressing into the Pan: Line an 8-inch square baking dish with parchment paper for easy removal. Press the crust mixture evenly into the bottom of the dish using the back of a measuring cup or your fingers to ensure it’s compact and level. This step is crucial for a sturdy crust that holds its shape when sliced.
5. Chill to Set: Place the crust in the refrigerator while you prepare the cheesecake layer. Chilling helps the crust firm up, allowing for easier slicing later.
Making the Cheesecake Layer
1. Gather Your Ingredients: For the cheesecake layer, you will need Greek yogurt, cream cheese, sweetener (like honey or agave), vanilla extract, and lemon juice.
2. Softening the Cream Cheese: Ensure that your cream cheese is at room temperature for a smooth mixture. This can take about 30 minutes or you can microwave it for about 10-15 seconds.
3. Mixing the Base: In a large mixing bowl, combine the softened cream cheese with Greek yogurt. Use an electric mixer on medium speed to blend until completely smooth and creamy—this should take about 2-3 minutes.
4. Adding Flavor: Mix in the sweetener, vanilla extract, and lemon juice until fully combined. Taste and adjust sweetness as needed. The acidity from the lemon juice not only enhances flavor but also balances the richness of the cream cheese.
5. Pouring Over the Crust: Carefully pour the cheesecake mixture over the chilled crust. Use a spatula to spread it evenly, ensuring that it fills all corners.
Assembling the Cheesecake
1. Level the Layer: Use the back of a spoon or an offset spatula to smooth the top. A flat surface ensures even slicing after freezing.
2. Prepare for Freezing: Cover the dish with plastic wrap or a lid and place it into the freezer. Freeze for at least 4-6 hours, or until completely firm.
Preparing the Cherry Topping
1. Choosing the Cherries: Fresh or frozen cherries can be used for the topping. If using fresh cherries, pit and slice them in half; if using frozen, allow them to thaw first.
2. Cooking the Sauce: In a small saucepan, combine the cherries with a tablespoon of sugar and a splash of water. Cook over medium heat until the cherries start to break down, about 5-7 minutes. If you prefer a thicker sauce, mix a teaspoon of cornstarch with a tablespoon of cold water and add it to the saucepan, stirring continuously until the sauce thickens.
3. Cooling the Topping: Remove the sauce from heat and let it cool completely before pouring it over the cheesecake. This step is crucial; hot sauce can melt the cheesecake layer.
Final Assembly and Serving Recommendations
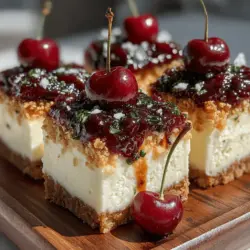
1. Layering the Topping: Once the cheesecake is frozen solid, remove it from the freezer and gently pour the cooled cherry topping over the cheesecake layer, spreading it evenly.
2. Slicing the Dessert: To cut the cheesecake into slices, let it sit at room temperature for about 10 minutes to soften slightly. Use a sharp knife, dipping it in warm water for cleaner cuts, and wipe it dry between slices.
3. Presentation Tips: For an elegant presentation, serve the slices on a chilled plate, garnished with fresh mint leaves or a dusting of powdered sugar. This not only enhances the visual appeal but also adds a fresh flavor contrast.
Nutritional Information
Understanding the nutritional profile of your dessert is essential for enjoying it as part of a balanced diet. Each serving of the Frozen Yogurt Cherry Cheesecake Slice contains approximately:
– Calories: 150
– Protein: 4g
– Carbohydrates: 20g
– Fat: 7g
– Fiber: 1g
Portion Control
These cheesecake slices are delightful yet indulgent, making portion control crucial. A single slice can fit well into a balanced diet without overstepping caloric intake. Compared to traditional cheesecake, which can exceed 300 calories per slice and contain significantly more fat, this frozen yogurt version offers a lighter alternative.
Serving Suggestions and Variations
Garnishing Ideas
For an extra touch of elegance, consider garnishing your cheesecake slices with:
– Whipped coconut cream or Greek yogurt for a creamy contrast.
– Fresh cherries or berries for a burst of color and flavor.
– A light drizzle of chocolate or caramel sauce for those with a sweet tooth.
Alternative Toppings
Feel free to get creative with your toppings. Suggestions include:
– Fruits: Sliced strawberries, blueberries, or raspberries can add a fresh twist.
– Nut Butter: A drizzle of almond or peanut butter can provide a creamy texture and nutty flavor.
– Chocolate Drizzle: Melted dark chocolate can elevate the dessert, providing a rich complement to the tart cherries.
Pairing Recommendations
This cheesecake pairs wonderfully with beverages such as:
– Iced Tea: A refreshing glass of iced green or herbal tea complements the dessert’s sweetness.
– Sparkling Water: The effervescence of sparkling water balances the creaminess of the cheesecake.
– Coffee: A warm cup of coffee or espresso can provide a lovely contrast to the cold dessert.
Storage and Freezing Tips
To maintain the quality and flavor of your Frozen Yogurt Cherry Cheesecake Slices, follow these storage tips:
1. Freezing Leftovers: After slicing, wrap each piece individually in plastic wrap and place them in an airtight container. This prevents freezer burn and keeps the slices fresh.
2. Storage Duration: The cheesecake can be stored in the freezer for up to 2 months. Ensure it is properly sealed to avoid any absorption of odors from other foods.
3. Thawing Before Serving: To enjoy your cheesecake slices, remove them from the freezer and let them thaw in the refrigerator for 1-2 hours or at room temperature for about 15 minutes before serving. This allows the slices to soften slightly, enhancing their creamy texture.
Conclusion
Preparing and enjoying Frozen Yogurt Cherry Cheesecake Slices is a delightful experience that combines the freshness of cherries with the creamy richness of yogurt and cream cheese. This recipe not only offers a guilt-free dessert option but also showcases versatility, allowing you to customize it for various occasions.
Whether you’re entertaining guests or treating yourself to a sweet indulgence, this cheesecake provides a unique flavor profile that is both satisfying and refreshing. With its elegant presentation and health benefits, you can enjoy this dessert without the usual guilt associated with traditional cheesecake.
So go ahead, whip up a batch of these delicious Frozen Yogurt Cherry Cheesecake Slices and savor the joy of a refreshing, homemade treat that’s perfect for any occasion!