Introduction to Roasted Fruit Pizza: A Unique Dessert Delight
Roasted Fruit Pizza is an innovative and delightful twist on traditional pizza that breaks away from the savory norms, offering a sweet sensation that is sure to impress. This recipe combines the comfort of homemade pizza with the vibrant essence of seasonal fruits, creating a dessert that is both visually appealing and deliciously satisfying. Imagine a crisp, golden crust topped with a creamy spread and a medley of caramelized fruits, each bite delivering a harmonious blend of textures and flavors. Roasted Fruit Pizza is not just a dessert; it’s an experience that can elevate any gathering or serve as a special treat for yourself.
The concept of using pizza as a dessert isn’t entirely new; many cultures have embraced the idea of sweet toppings on a doughy base. However, the Roasted Fruit Pizza stands out due to its emphasis on fresh, roasted fruits that enhance the natural sweetness while offering a delightful contrast to the creamy base. This dish is perfect for summer barbecues, holiday celebrations, or any occasion that calls for a unique and indulgent treat.
In the following sections, we will explore the necessary ingredients, step-by-step preparation methods, and the reasons why Roasted Fruit Pizza deserves a spot in your dessert repertoire. Whether you are a seasoned baker or a novice in the kitchen, this recipe will guide you through the process of creating a stunning dessert that will leave your guests raving.
Understanding the Base: Crafting the Perfect Pizza Dough
To create a delicious Roasted Fruit Pizza, it is essential to start with a solid foundation: the pizza dough. The base of your pizza plays a crucial role in the overall texture and flavor of the dish. A well-made dough will provide the ideal canvas for the creamy spread and roasted fruits.
Ingredients for the Pizza Base
– All-Purpose Flour: This is the primary ingredient in your pizza dough. It provides the structure necessary for a firm yet tender crust. Opt for high-quality all-purpose flour for the best results.
– Instant Yeast: Essential for leavening, instant yeast helps the dough rise and gives it a light, airy quality. This type of yeast is convenient because it doesn’t require proofing, allowing for a quicker preparation process.
– Salt: A fundamental ingredient that not only enhances the flavor of the dough but also strengthens the gluten structure, contributing to the overall texture.
– Sugar: A small amount of sugar is added to the dough to promote browning and add a hint of sweetness, which will complement the dessert aspect of the pizza.
– Olive Oil: This ingredient enriches the dough, adding flavor and moisture while also helping to achieve a crisp crust.
– Warm Water: Used to activate the yeast and bring the dough together, warm water should be at a temperature that is comfortable to the touch (around 110°F or 43°C) to ensure optimal yeast activation.
The Art of Making Pizza Dough
Making pizza dough involves a series of steps that ensure your crust rises beautifully and has the right texture. Begin by combining the dry ingredients—flour, instant yeast, salt, and sugar—in a large mixing bowl. Mixing these dry ingredients first ensures that the salt and yeast do not come into direct contact initially, which can hinder the yeast’s ability to activate.
Next, create a well in the center of the dry mixture and gradually incorporate the warm water and olive oil. Gently stir the mixture until it begins to come together into a shaggy dough. At this point, transfer the dough onto a lightly floured surface and begin kneading. Kneading is a vital step that develops the gluten in the flour, resulting in a smooth, elastic dough. Aim to knead for about 8 to 10 minutes, or until the dough is soft and pliable.
Once the dough is kneaded to perfection, form it into a ball and place it in a lightly greased bowl. Cover the bowl with a damp cloth or plastic wrap and allow the dough to rise in a warm, draft-free area. This fermentation process typically takes about 1 to 1.5 hours, or until the dough has doubled in size. This step is essential, as it not only gives your crust its airy texture but also enhances the flavor through the fermentation of sugars present in the flour.
By the time your dough has risen, you will be well on your way to assembling your Roasted Fruit Pizza. The next step is to prepare the vibrant toppings that will make this dessert not only delicious but also a feast for the eyes.
Roasted Fruit Topping: A Symphony of Flavors
The toppings for Roasted Fruit Pizza are where the dish truly shines. A medley of seasonal fruits, when roasted, transforms into a sweet and succulent layer that pairs perfectly with the creamy base and crisp crust.
Ingredient Breakdown for Roasted Fruit
– Strawberries: These berries add a burst of sweetness and a bright red color to your pizza. Their juicy texture intensifies when roasted, creating a delightful contrast with the other ingredients.
– Peaches: Known for their fragrant aroma and sweet flavor, peaches become tender and caramelized when roasted. Their natural sugars enhance the overall sweetness of the dessert.
– Blueberries: These small but mighty berries offer a pop of color and a slightly tart flavor that balances the sweetness from the strawberries and peaches.
– Honey or Maple Syrup: A drizzle of honey or maple syrup adds an additional layer of sweetness while helping to caramelize the fruits during roasting. Choose based on your flavor preference; both options work beautifully.
– Olive Oil: A light coating of olive oil on the fruit before roasting not only aids in the caramelization process but also enhances the flavor, making the fruit even more delicious.
– Vanilla Extract: A hint of vanilla extract can elevate the flavor profile of the roasted fruits, adding a warm and inviting aroma that rounds out the dish.
– Salt: Adding a pinch of salt enhances the sweetness of the fruits and creates a more complex flavor profile.
– Lemon Zest: The brightness of lemon zest adds a refreshing acidity, balancing the sweetness of the roasted fruits and enhancing their natural flavors.
Roasting Techniques
Roasting fruit is a simple yet transformative technique that caramelizes the natural sugars, intensifying their flavor and creating a tender texture. To achieve the best results, preheat your oven to around 400°F (200°C). This temperature is ideal for roasting fruits, allowing them to cook evenly without becoming mushy.
Prepare a baking sheet lined with parchment paper for easy cleanup. Toss your chopped fruits with a drizzle of olive oil, honey or maple syrup, a pinch of salt, and lemon zest in a mixing bowl. Ensure the fruits are evenly coated to guarantee uniform roasting. Spread the fruit mixture out in a single layer on the prepared baking sheet to promote even cooking.
Roast the fruits in the preheated oven for about 15 to 20 minutes, or until they are tender and slightly caramelized. Keep an eye on them to prevent burning; you want a beautiful golden color without losing the vibrant hues of the fruits. Once roasted, remove the baking sheet from the oven and allow the fruits to cool slightly while you prepare the creamy spread that will complete your Roasted Fruit Pizza.
In the next section, we will explore how to make the creamy spread that serves as the perfect complement to your roasted fruits, bringing everything together in a delicious finale.
{{image_2}}
Cream Cheese: The Creamy Foundation
The heart of our Roasted Fruit Pizza lies in the creamy spread, which serves as the perfect canvas for our roasted fruits. Cream cheese is an essential ingredient, providing a luxurious, creamy texture that balances the natural sweetness of the fruits. To enhance this delightful base, we will mix the cream cheese with powdered sugar, vanilla extract, and lemon juice.
Ingredients for the Creamy Spread
– 8 oz cream cheese, softened
– 1 cup powdered sugar
– 1 tsp vanilla extract
– 1-2 tbsp lemon juice (to taste)
This combination not only adds sweetness but also infuses the mixture with a hint of acidity from the lemon juice, brightening the flavors. The vanilla extract contributes warmth and depth, resulting in a spread that harmonizes beautifully with the roasted fruits.
Whipping Up the Creamy Spread
Achieving the perfect creamy texture is essential for this recipe. Start by allowing your cream cheese to come to room temperature, as this will make it easier to blend smoothly. Using a hand mixer or a stand mixer, whip the cream cheese until it becomes light and fluffy. Gradually add the powdered sugar, mixing on low speed to prevent a sugar cloud from forming. Once incorporated, add the vanilla extract and lemon juice, adjusting the quantity of lemon juice based on your taste preferences. Whip until the mixture is fully combined and creamy, ensuring no lumps remain. This spread should be thick yet spreadable, allowing it to adhere well to the pizza base.
Shaping and Baking the Pizza Base
Shaping the Pizza
After allowing your dough to rise, it’s time to shape it into a pizza base. Lightly flour your work surface to prevent sticking. Gently punch down the risen dough to release any air bubbles. Roll the dough into a ball, then begin to flatten it into a circle. Aim for a thickness of about ¼ inch, which will provide a crispy yet chewy crust when baked. Use your hands or a rolling pin to achieve a uniform shape. For a rustic look, don’t worry too much about perfection—embracing slight imperfections can add character to your pizza.
Baking Techniques for Optimal Texture
Before baking, ensure your oven is preheated to 475°F (245°C). A hot oven is critical for achieving that desired crispy, golden crust. Place your shaped pizza base on a baking sheet lined with parchment paper or a preheated pizza stone. Bake the crust for about 10-12 minutes, or until the edges are golden brown and the base sounds hollow when tapped. Keep an eye on it during the last few minutes of baking to avoid overcooking. Once baked, remove it from the oven and allow it to cool slightly before assembling the pizza.
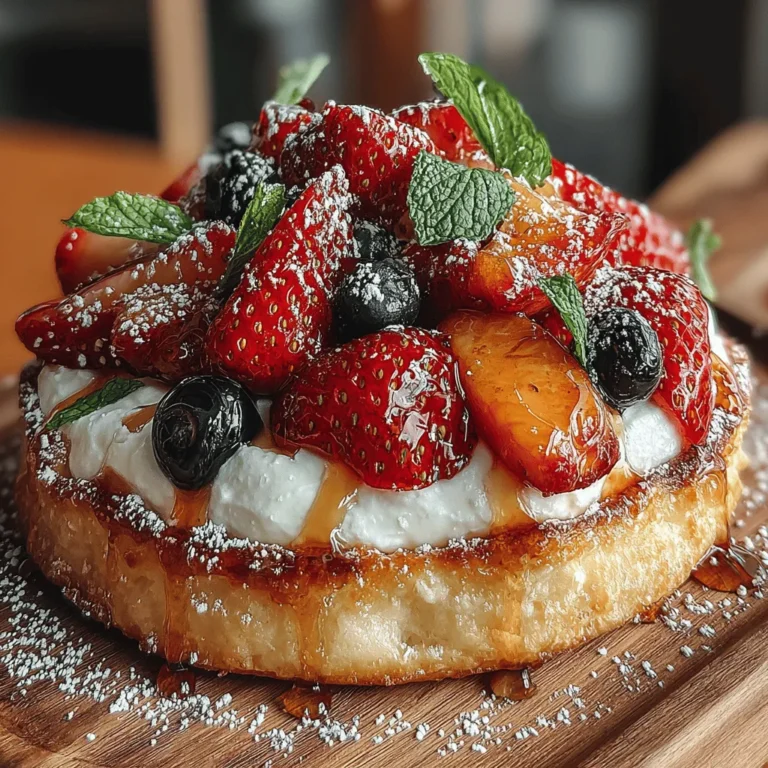
Assembling the Roasted Fruit Pizza: A Visual Delight
Layering the Components
Now that your pizza base has cooled, it’s time to bring everything together. Spread the creamy mixture evenly over the surface of the pizza, leaving a slight border around the edges for a beautiful presentation. Use a spatula or the back of a spoon to create an even layer. Next, it’s time to add the star of the show: the roasted fruits.
Arrange your roasted fruits artistically atop the cream cheese spread. The vibrant colors of peaches, figs, or strawberries will create a stunning visual appeal, making your Roasted Fruit Pizza not just a dessert but a centerpiece. Feel free to mix and match your fruit choices based on what’s in season or what you have on hand.
Finishing Touches for Flavor and Presentation
To elevate both the flavor and the visual appeal, garnish your finished pizza with fresh mint leaves. The bright green color and refreshing aroma of mint will add an extra layer of sophistication. For a touch of sweetness, drizzle some honey over the top. Honey complements the roasted fruits and cream cheese spread beautifully, enhancing the overall flavor profile.
Serving Suggestions: Enjoying the Roasted Fruit Pizza
Best Practices for Serving
When it comes time to serve your Roasted Fruit Pizza, consider slicing it into wedges for easy sharing. Use a sharp knife or pizza cutter to cut through the crust without disturbing the spread or toppings. This pizza can be enjoyed warm or at room temperature, making it a versatile dessert option for any occasion.
Serve it at a summer gathering, a birthday party, or even as a sweet treat to end a weeknight dinner. Pair it with a scoop of vanilla ice cream or a dollop of whipped cream for an indulgent experience.
Versatility of the Pizza
One of the greatest aspects of Roasted Fruit Pizza is its versatility. It can be adapted to suit various preferences and dietary requirements. For a gluten-free option, use a gluten-free pizza dough. If you want to make it vegan, substitute the cream cheese with a plant-based alternative and use maple syrup instead of honey.
This dessert is not only a feast for the eyes but also a delightful way to showcase seasonal fruits. Whether you’re entertaining guests or simply treating yourself, Roasted Fruit Pizza is sure to impress.
Conclusion: Indulging in a Unique Dessert Experience
Roasted Fruit Pizza is a delightful fusion of flavors and textures that can transform any meal into a memorable experience. With its homemade crust, sweet roasted fruits, and creamy spread, this unique dessert is not only visually appealing but also deliciously satisfying. Embrace the joy of making this dish and impress your friends and family with a dessert that showcases the beauty of seasonal fruits.
As you savor each bite, you’ll appreciate the crispy crust, the creamy layer, and the sweet, caramelized fruits that blend harmoniously. Enjoy the process of creating this culinary masterpiece and let the delightful aroma fill your kitchen. Roasted Fruit Pizza is more than just a dessert; it’s an invitation to celebrate creativity in the kitchen. Whether it’s a special occasion or a casual gathering, this pizza will surely become a favorite in your dessert repertoire.