Refreshing Watermelon Lemonade Pops: A Summer Delight
As the sun shines brighter and temperatures start to rise, there’s nothing quite like a refreshing drink to help you cool off. Watermelon and lemonade are two quintessential summer staples, celebrated for their hydrating properties and vibrant flavors. When combined, they create an irresistible treat that not only quenches your thirst but also offers a delightful burst of natural sweetness. Enter the Watermelon Lemonade Pops—an easy-to-make frozen dessert that encapsulates the essence of summer in every bite.
This recipe for Watermelon Lemonade Pops is the perfect way to enjoy the warm weather while indulging in a healthy snack. Made with simple, fresh ingredients, these popsicles are not only delicious but also packed with nutrients. They are ideal for hot afternoons, backyard barbecues, or any outdoor gathering where you want to impress your guests with minimal effort.
Understanding the Ingredients
To create the perfect Watermelon Lemonade Pops, it’s essential to understand the benefits and roles of each ingredient. Let’s take a closer look at the key components that make this recipe both delightful and nutritious.
Watermelon
Watermelon is the star of this recipe, and for good reason. This juicy fruit is composed of about 92% water, making it one of the most hydrating foods available. Beyond hydration, watermelon is low in calories and rich in vitamins A and C, as well as antioxidants like lycopene, which have been linked to various health benefits, including improved heart health and reduced inflammation.
When selecting a seedless watermelon, look for one that feels heavy for its size, has a uniform shape, and a smooth, dull skin. A creamy yellow spot on the underside indicates that it ripened on the vine, enhancing its sweetness. Avoid any watermelons with bruises or cuts, as these can affect the quality and flavor of your pops.
Lemon Juice
Freshly squeezed lemon juice is the second key ingredient in this refreshing recipe. The tartness of lemon juice balances the sweetness of the watermelon, creating a harmonious flavor profile. Lemons are also an excellent source of vitamin C, which is vital for a healthy immune system and skin. Additionally, lemons contain antioxidants that can help protect the body against damage from free radicals.
For the best flavor, always opt for freshly squeezed lemon juice rather than bottled varieties, which can contain preservatives and additives that alter the taste. To extract the most juice from your lemons, roll them on the countertop with your palm before cutting; this helps break down the membranes inside, making it easier to release the juice.
Sweeteners: Honey vs. Maple Syrup
Sweetening your Watermelon Lemonade Pops can be done using natural sweeteners like honey or maple syrup. Both options have their unique flavors and health benefits. Honey, a natural product derived from bees, offers antibacterial properties and has been used for centuries as a remedy for various ailments. It tends to have a more robust flavor that pairs well with the fruity watermelon.
On the other hand, maple syrup, which is derived from the sap of maple trees, has a distinct, rich flavor and is a great option for those following a vegan diet. It also contains minerals like manganese and zinc. When choosing between the two, consider your dietary preferences and the level of sweetness you desire. You can always adjust the amount to suit your taste.
Cold Water and Lemon Zest
Adding cold water to your popsicle mixture is crucial for achieving the right texture and taste. Cold water helps to create a smooth consistency when blended, ensuring that your popsicles freeze evenly and maintain a refreshing flavor.
Incorporating lemon zest into the mixture elevates the flavor profile by adding an aromatic touch. Zest contains oils that provide a bright, citrusy scent and taste that enhances the overall experience of the pops. It’s also rich in antioxidants and can contribute to the digestive benefits associated with consuming lemons.
Optional Garnish: Fresh Mint
While not a required ingredient, fresh mint can take your Watermelon Lemonade Pops to the next level. Mint leaves add a refreshing burst of flavor and a pop of color that makes your popsicles visually appealing. Additionally, mint is known for its digestive benefits and can even help with respiratory issues, making it a great complement to the hydrating properties of watermelon and lemon.
Step-by-Step Instructions for Making Watermelon Lemonade Pops
Now that you understand the ingredients, let’s dive into the first step of making your Watermelon Lemonade Pops: preparing the watermelon.
1. Preparing the Watermelon
Start by selecting a ripe, seedless watermelon. Once you have your watermelon, place it on a cutting board and carefully slice it in half. Use a large spoon to scoop out the flesh, discarding any seeds you encounter. Aim for about 4 cups of watermelon flesh, which will provide the base for your pops.
Next, chop the watermelon into smaller chunks for easier blending. Transfer the chunks into a blender or food processor. Blend the watermelon on high speed until it transforms into a smooth puree. If you prefer a slightly chunkier texture, you can pulse the blender a few times to achieve your desired consistency.
After blending, strain the watermelon puree through a fine mesh sieve into a large bowl or pitcher to remove any pulp. This step is crucial for ensuring that your popsicles have a smooth texture, which is especially desirable when frozen.
Following these initial steps will set the foundation for your Watermelon Lemonade Pops. As you continue with the recipe, you will blend in the other ingredients to create a refreshing treat that captures the essence of summer. Stay tuned for the next part of the recipe, where we will explore how to combine these ingredients into a delicious frozen delight!
{{image_2}}
Detailed Instructions on Blending Watermelon into Juice
To start your watermelon lemonade pops, the first step is to prepare fresh watermelon juice. Choose a ripe, juicy watermelon—look for one that feels heavy for its size with a uniform shape and smooth, dull skin.
1. Cutting the Watermelon: Begin by slicing the watermelon in half. Use a sturdy knife to cut it into manageable wedges. Be careful while handling the knife and watermelon to avoid any slips.
2. Removing the Flesh: Scoop out the watermelon flesh with a spoon, discarding the seeds as you go. Alternatively, if your watermelon is seedless, you can skip this step. Place the watermelon chunks in a blender, filling it about halfway to allow room for blending.
3. Blending: Blend the watermelon on high speed until it reaches a smooth consistency. This usually takes around 30 seconds to a minute. If your blender has a pulse option, use it to break down any stubborn chunks.
4. Straining Options: To achieve a smooth juice, you may want to strain the blended watermelon. Place a fine mesh strainer or cheesecloth over a bowl and pour the blended watermelon mixture through it. Use a spatula to press down on the pulp, extracting as much juice as possible. If you prefer a chunkier texture, you can skip this step and use the blended watermelon directly.
Combining Ingredients for Perfect Flavor
Once you have your fresh watermelon juice, it’s time to combine it with lemon juice and sweetener for the ideal balance of flavors.
1. Mixing the Juices: In a large mixing bowl or pitcher, combine the strained watermelon juice with freshly squeezed lemon juice. The acidity of the lemon juice will enhance the sweetness of the watermelon and create a refreshing balance.
2. Adding Sweetener: Depending on your personal taste and the sweetness of the watermelon, add a sweetener of your choice. This could be simple syrup, agave nectar, or honey. Stir the mixture well to ensure the sweetener dissolves completely into the juice.
3. Tasting and Adjusting Sweetness: After mixing, take a small taste. If the mixture is too tart, add more sweetener gradually, mixing well after each addition. This step is crucial to achieving the perfect flavor profile for your pops.
Pouring into Molds
Now that your mixture is well-balanced and delicious, it’s time to pour it into molds.
1. Selecting the Right Molds: Choose silicone molds or traditional popsicle molds. Silicone molds are particularly user-friendly as they make unmolding easier.
2. Filling the Molds: Carefully pour the watermelon lemonade mixture into the molds. Fill them to about ¾ full to allow for expansion as they freeze. To prevent spills, you may want to use a funnel or a measuring cup with a spout.
3. Inserting Sticks: If using popsicle sticks, insert them into the center of each mold right after filling. If the mixture is too liquid, wait a few minutes for it to start setting before adding the sticks to keep them upright.
Freezing Process
The freezing process is critical for achieving the perfect texture for your watermelon lemonade pops.
1. Freezing Time: Place the molds in the freezer and allow them to freeze for at least 4 to 6 hours. For best results, overnight freezing is recommended. This will ensure the pops are solid and ready for unmolding.
2. Checking for Doneness: To check if they are ready, gently pull one of the molds out of the freezer and give it a slight shake. If it feels solid, they’re ready to be removed.
Unmolding Techniques
Removing the pops from the molds can be tricky, but with the right technique, you can do it without damaging them.
1. Letting Them Sit: If the pops are too frozen to come out easily, let the molds sit at room temperature for a couple of minutes. This will slightly thaw the outside, making them easier to remove.
2. Running Under Warm Water: For quicker results, run warm water over the outside of the molds for about 10-20 seconds. Be careful not to submerge the molds in water, as this could dilute the pops.
3. Removing the Pops: Gently pull on the popsicle sticks while twisting the molds. The pops should slide out easily. If they resist, repeat the warm water process until they loosen up.
Garnishing and Serving Suggestions
Presentation can elevate the enjoyment of your watermelon lemonade pops.
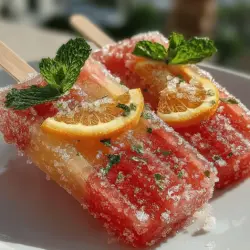
1. Creative Garnishes: Consider garnishing your pops with fresh mint leaves, thin slices of lemon, or even a sprinkle of sea salt to highlight the flavors. For an extra touch, you can dip the tops of the pops in melted chocolate and then into crushed nuts or coconut flakes before freezing.
2. Ideal Occasions: These refreshing pops are perfect for summer gatherings, pool parties, picnics, or as a delightful treat on a hot day. Serve them on a platter with fresh fruit and drinks to create a vibrant display.
Nutritional Information
Understanding the nutritional value of your watermelon lemonade pops can help you enjoy them guilt-free.
– Calories: Each watermelon lemonade pop (assuming a standard serving size of 100 ml) contains approximately 45-50 calories.
– Sugar Content: The natural sugars from the watermelon and added sweetener contribute to about 10-12 grams of sugar per pop.
– Other Nutritional Benefits: Watermelon is primarily made up of water (over 90%), making it an excellent hydrating snack. It’s also a good source of vitamins A and C, as well as antioxidants like lycopene.
These pops can fit nicely into a balanced diet, especially during summer when fruits are fresh and hydration is essential.
Creative Variations of Watermelon Lemonade Pops
Feel free to get creative with your watermelon lemonade pops by adding other flavors!
1. Other Fruits: Blend in other fruits like strawberries, blueberries, or raspberries for a colorful twist. Simply add them to the blender with the watermelon for a mixed fruit flavor.
2. Herbs and Spices: For a unique twist, consider adding fresh herbs like basil or mint before blending. A hint of ginger or lime zest can also add an exciting flavor dimension.
3. Creamy Versions: For a creamier texture, try blending in coconut milk or yogurt to the mixture before freezing, creating a tropical-style popsicle.
Conclusion
Making watermelon lemonade pops at home is not only a fun and rewarding experience but also a fantastic way to enjoy a refreshing treat during the warmer months. The combination of sweet watermelon and tangy lemon creates a perfect balance that can delight anyone.
We encourage you to experiment with the recipe and share your experiences. Whether you stick to the classic combination or try out the creative variations, these pops are sure to bring joy to your summer days. Embrace the joy of homemade frozen treats, and savor each bite of your delicious watermelon lemonade pops!