Roasted Garlic Bliss Spread Recipe: A Creamy, Flavorful Delight
Introduction
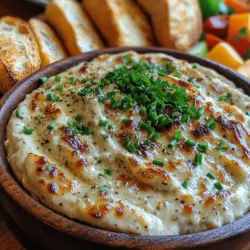
Roasted garlic is often regarded as a culinary treasure, captivating food enthusiasts with its rich, sweet flavor and remarkable versatility. Unlike its raw counterpart, which can be sharp and pungent, roasted garlic transforms into a creamy, mellow delight that can elevate a wide range of dishes. Whether spread on crusty bread, dolloped on roasted vegetables, or paired with meats, roasted garlic adds a depth of flavor that is nothing short of exquisite. This Roasted Garlic Bliss Spread brings together the magic of roasted garlic and a few simple ingredients to create a luxurious spread that is perfect for entertaining or enjoying during a cozy night in.
What makes this recipe truly appealing is its combination of simplicity with a touch of gourmet flair. With just a handful of ingredients and minimal effort, you can impress your guests or treat yourself to a delightful snack. As we explore this recipe, you will discover how easy it is to create a creamy, flavorful spread that will have everyone asking for the recipe.
Understanding Roasted Garlic
The process of roasting garlic is a culinary transformation that enhances its natural qualities. When garlic is subjected to heat, the sharp, assertive flavors mellow significantly, yielding a sweet, nutty essence that can be both comforting and indulgent. This transformation occurs as the natural sugars in garlic caramelize, creating a rich, buttery texture that is perfect for spreading.
Beyond its exceptional flavor, roasted garlic offers numerous health benefits. Garlic is known for its powerful antioxidant properties, which can help combat oxidative stress in the body. Additionally, regular consumption of garlic has been linked to potential immune-boosting effects, making it a popular choice in traditional remedies. With each bite of Roasted Garlic Bliss Spread, you not only indulge your taste buds but also nourish your body with the goodness of garlic.
Ingredients for Roasted Garlic Bliss Spread
Creating the perfect Roasted Garlic Bliss Spread requires a few key ingredients, each contributing to the overall flavor and texture of the finished product.
– Garlic: The star of the show, heads of garlic are essential to this recipe. When selecting garlic, look for firm heads with tight, unbroken skin. The flavor profile of roasted garlic is sweet and savory, making it the ideal base for this spread.
– Olive Oil: This ingredient plays a crucial role in the roasting process, helping to soften the garlic and enhance its flavor. A high-quality extra virgin olive oil not only aids in roasting but also adds a subtle richness to the spread.
– Cream Cheese, Sour Cream, and Mayonnaise: These ingredients work together to create a creamy texture that balances the robust flavor of the roasted garlic. The cream cheese adds richness, while the sour cream and mayonnaise introduce tanginess, resulting in a well-rounded flavor profile.
– Lemon Juice: A splash of lemon juice is essential for adding brightness and acidity to the spread. This acidity cuts through the richness of the cream and garlic, ensuring that the flavors remain vibrant.
– Seasonings: Simple seasonings like black pepper and sea salt enhance the overall flavor of the spread. These ingredients are key in bringing out the natural sweetness of the roasted garlic while providing a well-balanced taste.
– Garnishes: Optional garnishes such as fresh parsley or chives not only add a pop of color but also contribute a refreshing note that complements the richness of the spread.
Step-by-Step Instructions
Creating your Roasted Garlic Bliss Spread is a straightforward process that yields impressive results. Follow these step-by-step instructions to ensure a perfect outcome:
1. Preheating the Oven: Begin by preheating your oven to 400°F (200°C). The right temperature is essential for achieving perfectly roasted garlic. A hotter oven can lead to burnt garlic, while a lower temperature may result in undercooked cloves.
With the oven preheating, you are well on your way to creating a spread that promises to delight the senses and bring gourmet flair to your table. In the next sections, we will delve deeper into the roasting process and the subsequent steps to combine these ingredients into a blissful spread. Stay tuned for the next part, where we will guide you through the roasting of garlic and the assembly of your Roasted Garlic Bliss Spread.
{{image_2}}
Preparing the Garlic
To create the perfect Roasted Garlic Bliss Spread, the first step is preparing the garlic heads. Start by selecting fresh, firm garlic bulbs. For a rich flavor, opt for organic garlic if available.
Techniques for Cutting and Oiling the Garlic Heads
1. Trim the Top: Using a sharp knife, slice off the top quarter of each garlic bulb. This exposes the individual cloves while keeping the bulb intact.
2. Drizzle with Oil: Place the garlic heads on a piece of aluminum foil or in a small baking dish. Generously drizzle olive oil over the exposed cloves, allowing the oil to seep into them. This not only enhances the flavor but also helps in achieving a beautiful golden color during roasting.
3. Wrap it Up: If using foil, wrap the garlic heads tightly to trap steam, which aids in the roasting process. If using a baking dish, cover it with a lid or foil.
Roasting Process
Now that your garlic is prepped, it’s time to roast it. The roasting process is vital for developing the sweet, caramelized flavor that makes this spread irresistible.
Tips for Achieving the Ideal Texture and Flavor During Roasting
1. Preheat the Oven: Set your oven to 400°F (200°C). A hot oven will help to caramelize the sugars in the garlic, resulting in that desired buttery texture.
2. Roasting Time: Place the wrapped garlic heads in the oven and roast for about 30-35 minutes. Check for doneness by gently squeezing the bulbs; they should feel soft and yield easily to pressure. If not, return them to the oven for an additional 5-10 minutes.
3. Cooling: Once roasted, remove the garlic from the oven and allow it to cool slightly before handling. This will make it easier to extract the cloves.
Extracting the Garlic
After roasting, extracting the garlic is simple yet requires a bit of care to avoid burns.
Best Practices for Handling Roasted Garlic Safely
1. Cool Down: Let the garlic sit until it’s cool enough to handle but still warm.
2. Squeeze Out the Cloves: Hold the bulb in one hand and gently squeeze it from the bottom. The roasted cloves should pop out easily. If they resist, use a fork or small spoon to assist.
3. Discard the Skins: Ensure all the papery skins are removed, as they won’t blend into the spread and can affect the texture.
Mixing Ingredients
With your roasted garlic ready, it’s time to blend it into a luscious spread.
Methods for Achieving a Smooth, Creamy Consistency
1. Combine Ingredients: In a mixing bowl or food processor, combine the extracted roasted garlic with cream cheese (or a vegan alternative), a splash of lemon juice, salt, and pepper.
2. Blend Thoroughly: Pulse the mixture in the food processor until smooth. If you prefer a chunkier texture, blend less. For an extra creamy consistency, add a tablespoon of olive oil or a dollop of sour cream.
3. Taste and Adjust: Give the mixture a taste and adjust the seasoning as necessary. This is also a great time to experiment with additional flavors.
Adjusting Flavor
The beauty of the Roasted Garlic Bliss Spread lies in its versatility.
Suggestions for Personalizing the Spread to Taste
1. Herbs and Spices: Add fresh herbs such as chives, parsley, or thyme for a fresh, bright flavor. Alternatively, sprinkle in spices like smoked paprika or red pepper flakes for a kick.
2. Cheeses: Incorporate grated Parmesan or feta for a tangy twist.
3. Acidity: If you prefer a more pronounced tang, consider adding a splash of balsamic vinegar or apple cider vinegar.
4. Sweetness: A hint of honey or maple syrup can balance the flavors, especially if you enjoy contrasts in savory dishes.
Garnishing
Garnishing your Roasted Garlic Bliss Spread not only enhances its visual appeal but can also elevate the overall flavor.
Creative Ideas for Adding Fresh Herbs
1. Herb Sprinkles: Finely chop herbs like basil, dill, or cilantro and sprinkle them on top just before serving for color and freshness.
2. Olive Oil Drizzle: A drizzle of high-quality olive oil not only makes the spread look inviting but also adds richness.
3. Toasted Nuts: Consider adding crushed nuts like walnuts or pine nuts for texture and a nutty flavor contrast.
Chilling and Serving
Once you’ve mixed and garnished your spread, chilling it is crucial for flavor development.
Discussing the Importance of Chilling for Flavor Development
1. Chill Time: If time allows, cover the spread and let it chill in the refrigerator for at least one hour. This resting period allows the flavors to meld beautifully, creating a more cohesive taste.
2. Serving Suggestions: Serve the spread with a variety of accompaniments to suit any occasion.
Serving Suggestions for Roasted Garlic Bliss Spread
Explore creative ways to enjoy the spread:
Pairings
1. Breads: Serve the Roasted Garlic Bliss Spread with crusty baguette slices, toasted pita, or artisanal crackers for a delightful snack or appetizer.
2. Vegetable Sticks: Fresh vegetable sticks such as carrots, celery, and bell peppers make for a healthy and crunchy pairing.
3. Cheese Platter: Include the spread as part of a cheese board, paired with an assortment of cheeses, olives, and dried fruits.
Occasions
1. Parties: This spread is perfect for gatherings, adding a gourmet touch to your appetizer table.
2. Family Gatherings: Serve it as a side dish during family meals, offering a flavorful addition that everyone will enjoy.
3. Simple Snack: Enjoy it on its own as a quick snack, perfect for a midday energy boost.
Presentation Ideas
1. Dishware: Present the spread in a rustic bowl or a chic ramekin, enhancing the appeal.
2. Garnishing Techniques: Use herbs and a light drizzle of olive oil to create an inviting look.
3. Accompaniment Arrangement: Arrange bread and veggies around the spread for a visually appealing display.
Nutritional Information
Understanding the nutritional content of your Roasted Garlic Bliss Spread is important for health-conscious individuals.
Nutritional Breakdown per Serving
– Calories: Approximately 80 calories
– Fat: 7g
– Carbohydrates: 4g
– Protein: 1g
– Fiber: 0g
Nutritional Benefits and Dietary Considerations
1. Healthy Fats: Olive oil provides heart-healthy monounsaturated fats.
2. Vitamins and Minerals: Garlic is known for its immune-boosting properties and is rich in vitamins C and B6, manganese, and selenium.
3. Dietary Fit: This spread is suitable for vegetarian and low-carb diets, making it a versatile addition to various meal plans.
Conclusion
Creating and enjoying the Roasted Garlic Bliss Spread is a delightful culinary experience that brings flavor and creativity to your table. Its versatility as a crowd-pleaser makes it suitable for any occasion, whether as a dip for a family gathering or a standout appetizer at a formal event.
Encourage your culinary creativity by customizing the spread to suit your personal taste, using the suggestions provided. Share this delicious treat with friends and loved ones, and let it become a staple in your culinary repertoire. With its rich flavor and smooth texture, the Roasted Garlic Bliss Spread is sure to be a hit, leaving everyone craving more.