Introduction
Crispy Breaded Halloumi Fingers are a delightful treat that beautifully combines the unique flavor profile of halloumi cheese with a satisfying crunch. This dish serves as an ideal snack or appetizer, perfect for entertaining guests or simply indulging in a flavorful bite at home. Halloumi, a semi-hard cheese originating from Cyprus, has gained popularity worldwide for its distinctive texture and ability to hold its shape when cooked. In this article, we will explore the art of preparing these crispy delights, offering you a comprehensive guide from understanding halloumi cheese to step-by-step instructions for creating the perfect breaded fingers. Additionally, we will discuss the nutritional aspects and serving suggestions to ensure that you can enjoy this dish to its fullest potential.
Understanding Halloumi Cheese
Exploring the Origins of Halloumi Cheese
Halloumi cheese has a rich history that dates back centuries. Traditionally made from sheep’s milk, and sometimes mixed with goat’s milk, this cheese is deeply rooted in Cypriot culture and is often associated with Mediterranean cuisine. Halloumi’s unique texture and flavor have made it a popular choice beyond its homeland, finding its way into various dishes around the globe. Its ability to resist melting when heated makes it an excellent candidate for grilling and frying, allowing it to develop a crispy outer layer while remaining creamy and soft on the inside.
The cultural significance of halloumi is evident, as it often features in festive meals and is a staple in many Mediterranean households. Its versatility allows it to be enjoyed in numerous ways, from salads and sandwiches to being served as an appetizer, like our crispy breaded halloumi fingers.
Nutritional Profile of Halloumi
When considering the nutritional aspects of halloumi cheese, it’s important to note its composition. A typical serving of halloumi, which is approximately 100 grams, contains around 300 calories, making it a relatively calorie-dense food. However, it also packs a punch with about 25 grams of protein and 20 grams of fat. The high protein content makes it an excellent choice for those looking to increase their protein intake without relying solely on meat sources.
In addition to its nutritional benefits, halloumi offers several health considerations. It is a good source of calcium, which is essential for maintaining strong bones and teeth. However, those watching their sodium intake should be cautious, as halloumi can be quite salty due to the brining process used in its preparation. Balancing halloumi with fresh vegetables or serving it alongside a light dip can help mitigate the sodium levels while enhancing overall flavor.
Ingredients Breakdown
Essential Ingredients for Crispy Breaded Halloumi Fingers
To create the perfect Crispy Breaded Halloumi Fingers, it’s crucial to gather the right ingredients. Each component plays a vital role in achieving the desired flavor and texture.
– Halloumi cheese: The star of this recipe is, of course, halloumi cheese. When selecting halloumi, look for a high-quality product that is firm and slightly springy to the touch. Fresh halloumi should have a clean, milky aroma, and if possible, choose one made from sheep’s milk for the best flavor.
– Flour: All-purpose flour is typically used in the breading process. It serves as the first layer of coating and helps to absorb moisture from the cheese, ensuring that the egg and breadcrumbs adhere properly. A light dusting of flour will create a barrier that helps to lock in the cheese’s moisture during frying.
– Eggs: Eggs play a crucial role in binding the ingredients together. By creating a wash with beaten eggs, you enable the breadcrumbs to stick to the cheese, resulting in a crispy exterior once fried. Choose large eggs for the best results.
– Panko breadcrumbs: When it comes to achieving that coveted crunch, panko breadcrumbs are the preferred choice over regular breadcrumbs. Panko is coarser and larger, allowing for more air pockets that contribute to a lighter, crunchier texture when fried.
– Seasonings: Enhancing the flavor of the halloumi fingers is key to a delicious dish. A mixture of smoked paprika and dried herbs, such as oregano or thyme, can elevate the taste profile significantly. Feel free to experiment with your favorite spices to customize the flavor to your liking.
– Oil for frying: The choice of oil is important for frying halloumi fingers. A neutral oil with a high smoke point, such as canola or vegetable oil, is ideal. Olive oil can also be used for a more robust flavor, but be mindful of its lower smoke point.
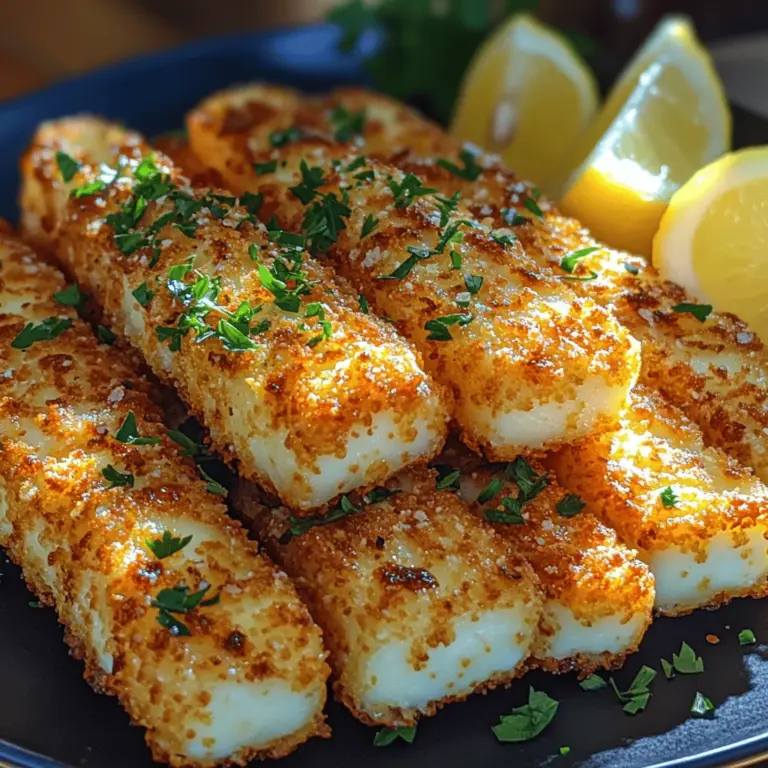
– Fresh lemon and herbs: To brighten the dish, serving crispy halloumi fingers with fresh lemon wedges and a sprinkle of herbs, such as parsley or cilantro, can add a refreshing touch, complementing the richness of the cheese.
Preparing the Halloumi Fingers
Cutting the Halloumi to Perfection
Once you have gathered all the ingredients, the next step is preparing the halloumi for frying. The way you slice the cheese can significantly impact the cooking time and texture of the finished product.
1. Techniques for slicing halloumi cheese: Begin by removing the halloumi from its packaging and draining any excess brine. Pat the cheese dry with a paper towel to remove moisture, which will help achieve a crispier coating. For optimal results, slice the halloumi into sticks or fingers that are about 1 inch wide. This thickness is perfect for cooking, as it allows the cheese to heat through while providing enough surface area for the crispy coating.
2. Importance of thickness for cooking and texture: The thickness of your halloumi slices plays a crucial role in the overall texture of the dish. If the slices are too thin, they may become overly crispy and lose their characteristic chewy texture. Conversely, if they are too thick, they may not cook evenly, resulting in a warm, soft center without the desired crunch. Finding the right balance in thickness will ensure that each bite of your crispy breaded halloumi fingers delivers a perfect combination of crunch and creaminess.
With your ingredients prepared and halloumi sliced to perfection, you are now ready to embark on the next steps of creating these deliciously crispy appetizers. Stay tuned for the following sections, where we will dive into the breading process and the frying technique that will bring your Crispy Breaded Halloumi Fingers to life.
{{image_2}}
Setting Up Your Breading Station
Creating an efficient workflow in the kitchen is essential for successfully breading your halloumi fingers. Here’s a step-by-step guide to help you set up your breading station:
1. Gather Your Ingredients: Ensure that you have all your ingredients on hand. For halloumi fingers, you will need halloumi cheese, all-purpose flour, eggs, and breadcrumbs. Consider using Panko breadcrumbs for an extra crunch.
2. Organize Your Workspace: A clean, organized workspace promotes efficiency. Arrange your ingredients in the order you will use them: flour first, followed by beaten eggs, and finally, breadcrumbs.
3. Prepare Your Bowls:
– Flour Bowl: Place about 1 cup of all-purpose flour in a shallow dish.
– Egg Bowl: Beat 2 to 3 eggs in another shallow dish. Season with a pinch of salt and pepper for added flavor.
– Breadcrumb Bowl: Pour 1 to 1.5 cups of breadcrumbs into a third shallow dish.
4. Use a Baking Sheet: Line a baking sheet with parchment paper or a silicone mat to place your breaded halloumi fingers. This will help keep your workspace neat and make for easier cleanup.
5. Maintain a Mess-Free Environment: To avoid unnecessary mess, use one hand for wet ingredients (eggs) and the other for dry ingredients (flour and breadcrumbs). This technique will keep your fingers from becoming a sticky mess, making the process smoother.
The Breading Process
Coating Techniques for Optimal Crunch
Achieving the perfect coating on your halloumi fingers is essential for that satisfying crunch. Here’s how to do it right:
1. Dredge in Flour: Start by taking a piece of halloumi and lightly coating it with flour. Ensure the cheese is evenly covered, as this helps the egg adhere better.
2. Dip in Egg: Next, transfer the floured halloumi into the beaten eggs. Allow any excess egg to drip off before moving to the breadcrumbs.
3. Coat with Breadcrumbs: Finally, place the egg-coated halloumi into the breadcrumbs. Press gently to ensure the breadcrumbs stick well. Make sure each piece is fully coated, as this will create that desired crispy texture.
Common Mistakes to Avoid During the Breading Process
– Skipping the Flour Step: Always remember to dredge in flour first. Skipping this step can result in the breadcrumbs not adhering properly to the cheese.
– Too Much Egg: Don’t let the halloumi soak in the egg wash. Excessive egg can cause the breadcrumbs to become soggy.
– Inconsistent Coating: Ensure that each piece is evenly coated to avoid uneven cooking and texture.
Frying the Halloumi Fingers
Creating the Perfect Frying Environment
The frying process is crucial for achieving perfectly crispy halloumi fingers. Here are some tips to create the ideal frying environment:
1. Select the Right Skillet: Use a heavy-bottomed skillet or frying pan to ensure even heat distribution. A cast-iron skillet is a fantastic choice for frying.
2. Oil Depth: Pour enough oil into the skillet to cover the bottom by about 1/4 inch. This depth allows for frying without fully submerging the halloumi, which can lead to sogginess.
3. Temperature Control: Heat the oil over medium heat until it shimmers but is not smoking. You can test the oil’s readiness by dropping a small piece of breadcrumb into it; if it sizzles immediately, the oil is hot enough.
Frying Techniques for Maximum Crispiness
To ensure your halloumi fingers are perfectly crispy, follow these frying techniques:
1. Do Not Overcrowd the Pan: Fry in batches if necessary. Overcrowding can lower the oil temperature, leading to greasy halloumi fingers.
2. Fry Until Golden Brown: Cook the halloumi fingers for about 2-3 minutes on each side, or until they are golden brown. Keep an eye on them; they can burn quickly.
3. Drain Excess Oil: Once cooked, transfer the halloumi fingers to a plate lined with paper towels to absorb any excess oil. This step is vital for maintaining crispiness.
Serving Suggestions
Plating Your Crispy Halloumi Fingers
Presentation plays a key role in any dish. Here are some creative ideas for plating your crispy halloumi fingers:
1. Simple and Elegant: Arrange the halloumi fingers in a line on a wooden serving board. This rustic presentation is perfect for casual gatherings.
2. Dipping Station: Create a dipping station by placing the halloumi fingers in a small bowl or on a platter, surrounded by small bowls of various sauces like tzatziki, spicy mayo, or sweet chili sauce.
3. Garnish with Fresh Herbs: Sprinkle fresh parsley or dill around the plate for a pop of color and added flavor.
Pairing with Sauces and Dips for Enhanced Flavor
The right sauces can elevate your halloumi fingers to another level. Here are some recommended pairings:
– Tzatziki Sauce: A classic Greek yogurt dip that complements the richness of halloumi beautifully.
– Honey and Chili Flakes: Drizzling honey mixed with chili flakes adds a sweet and spicy kick.
– Sriracha Mayo: A creamy and spicy sauce that provides a delightful contrast to the crispy cheese.
Garnishing for Extra Flair
Adding garnishes can enhance both the visual appeal and flavor profile of your dish:
– Herb Garnishes: Fresh herbs like cilantro, parsley, or basil can brighten the dish. Consider finely chopping them and sprinkling them on top for a fresh touch.
– Lemon Wedges: Serving lemon wedges alongside your halloumi fingers is essential. The acidity of the lemon juice cuts through the richness of the cheese, adding a zesty boost that balances the dish beautifully.
Conclusion
Crispy Breaded Halloumi Fingers are an exquisite dish that showcases the versatility of halloumi cheese. With this comprehensive guide, you are now equipped with the knowledge to create these delicious bites in your own kitchen. Whether served at a gathering or enjoyed as a simple snack, these halloumi fingers are sure to impress with their crispy exterior and rich flavor. Enjoy your culinary journey with this delightful recipe!
Remember, practice makes perfect, so don’t hesitate to experiment with different coatings or dipping sauces to customize this dish to your taste. Happy cooking!
