Introduction
There’s something undeniably nostalgic about strawberry pop tarts. These delightful pastries evoke memories of childhood breakfasts and afternoon snacks, yet there’s nothing quite like the taste of a homemade version. Homemade strawberry pop tarts not only offer a more flavorful experience but also allow you to customize every aspect to your liking. Imagine biting into a flaky, buttery crust filled with luscious, sweet strawberries — it’s a treat that’s hard to resist.
What sets this recipe apart is the emphasis on using fresh ingredients. The quality of the components you choose can dramatically affect the final product. By opting for ripe, juicy strawberries, you ensure that the filling bursts with flavor, elevating your pop tarts from simple pastries to gourmet delights. In contrast to store-bought varieties laden with preservatives and artificial flavors, homemade strawberry pop tarts provide a wholesome alternative that celebrates the natural sweetness of the fruit.
This recipe takes you through the joyful process of creating your own strawberry pop tarts from scratch. Whether you are an experienced baker or a novice in the kitchen, this guide will help you navigate each step with ease. Get ready to discover the satisfaction of mixing, rolling, and baking your way to a delightful treat that’s sure to impress family and friends alike.
Understanding the Ingredients
Before diving into the baking process, it’s essential to familiarize yourself with the key ingredients that will bring your sweet strawberry dreams to life. Each component plays a pivotal role in achieving the perfect pop tart, so let’s break them down.
All-Purpose Flour
The foundation of any pastry is its flour, and for our pop tarts, high-quality all-purpose flour is crucial. This type of flour strikes the right balance between protein content and tenderness, creating a flaky yet sturdy crust. Avoid using cake flour, as it lacks the necessary structure to hold up the filling. When measuring flour, be sure to spoon it into your measuring cup and level it off with a knife to avoid packing it down, which can lead to a tough pastry.
Fresh Strawberries
The star of the show is undoubtedly the strawberries. Using fresh, ripe strawberries not only enhances the flavor of your filling but also contributes to the overall texture of the pop tarts. Look for strawberries that are firm, vibrant in color, and free from blemishes. Although frozen strawberries can be used in a pinch, fresh strawberries will yield a superior taste and texture. They will burst in the oven, releasing their juices and creating a delightful filling that perfectly complements the pastry.
Sugar, Lemon Juice, and Cornstarch
To enhance the flavor of the strawberry filling, we’ll use sugar, lemon juice, and cornstarch. Sugar adds sweetness and balances the natural tartness of the strawberries, ensuring the filling is deliciously sweet without being overwhelming. Lemon juice, while seemingly small, plays an important role in brightening the flavors; it adds a subtle acidity that contrasts beautifully with the sweetness of the strawberries. Cornstarch is a key ingredient for achieving the right consistency in the filling; it acts as a thickening agent, preventing the filling from becoming too runny.
Icing Ingredients and Optional Decorations
No pop tart is complete without a sweet glaze to top it off! The icing typically consists of powdered sugar, milk, and vanilla extract. This simple mixture brings a delightful sweetness that complements the fruity filling. You may also choose to add colorful sprinkles or edible glitter for an extra touch of whimsy. These optional decorations not only enhance the visual appeal of your pop tarts but also make them even more fun to eat, especially for kids.
Creating the Perfect Pastry
Now that we’ve covered the ingredients, let’s get into the heart of the recipe: crafting the pastry. Making the perfect pop tart shell requires attention to detail and some key techniques that will ensure a flaky and delicious crust.
Step-by-Step Pastry Preparation
1. Chill the Butter: Start with cold, unsalted butter. Chilling the butter is crucial because it creates pockets of steam as it melts during baking, resulting in a flaky texture. Cut the butter into small cubes and place it back in the refrigerator while you gather your other ingredients.
2. Combine Dry Ingredients: In a large mixing bowl, combine the all-purpose flour and a pinch of salt. The salt enhances the flavor of the pastry, so don’t skip this step.
3. Cut in the Butter: Add the chilled butter to the flour mixture. Using a pastry cutter or your fingertips, work the butter into the flour until the mixture resembles coarse crumbs. This process should be done quickly to keep the butter cold.
4. Add Ice Water: Gradually add ice water, one tablespoon at a time, mixing gently until the dough begins to come together. The amount of water needed may vary, so be cautious not to add too much at once. The dough should be moist but not sticky.
5. Form the Dough: Once the dough has come together, turn it out onto a lightly floured surface. Divide it into two equal portions, shaping each into a disc. Wrap each disc in plastic wrap, and refrigerate for at least 30 minutes. Chilling the dough not only makes it easier to roll out later but also helps to relax the gluten, resulting in a tender pastry.
Importance of Chilling
Chilling the butter and the dough is a crucial step that should never be overlooked. It prevents the butter from melting before the pastry is baked, allowing it to create those lovely flaky layers. If you’re short on time, consider chilling the dough for just 15-20 minutes, but always aim for the full 30 minutes if possible.
Preparing for Rolling
After the dough has chilled, it’s time to roll it out. Begin by lightly flouring your work surface and rolling pin to prevent sticking. The goal is to achieve a thickness of about 1/8 inch. Use even pressure as you roll out the dough, turning it occasionally to maintain a round shape. Don’t worry if it’s not a perfect circle; the rectangles can always be trimmed to size later.
Dividing and Wrapping
Once rolled out, use a sharp knife or a pizza cutter to cut the dough into rectangles. A typical pop tart size is approximately 3×4 inches, but feel free to adjust based on your preference. After cutting, place half of the rectangles on a parchment-lined baking sheet for easy cleanup and even baking.
Resting the Dough
Before assembling your pop tarts, it’s essential to allow the dough to rest for a few minutes. This will help to relax the gluten once again, making it more pliable and easier to work with. While you wait, you can start preparing the strawberry filling.
Crafting the Strawberry Filling
Now that your pastry is ready, let’s focus on the strawberry filling. This step is where the magic happens, transforming fresh strawberries into a sweet, thick filling that will be encased in your pastry.
Step-by-Step Filling Preparation
1. Prepare the Strawberries: Start by rinsing and hulling the strawberries. Remove the green tops and slice the strawberries into small pieces. This will help them cook down evenly and prevent large chunks from disrupting the texture of your filling.
2. Combine Ingredients: In a medium saucepan, combine the sliced strawberries, sugar, lemon juice, and cornstarch. Stir gently to coat the strawberries evenly. The sugar will draw out the natural juices from the strawberries, creating a syrupy mixture.
3. Cook the Filling: Place the saucepan over medium heat and bring the mixture to a gentle boil. Stir frequently to prevent sticking. As the mixture heats, the strawberries will soften and release more juice. The cornstarch will begin to thicken the filling, creating a luscious texture.
4. Cool the Filling: Once the filling has thickened and the strawberries are soft, remove it from the heat and let it cool to room temperature. Cooling is essential, as a hot filling could melt the pastry during assembly and lead to soggy pop tarts.
Balancing Flavors
The addition of lemon juice in the filling serves a dual purpose: it brightens the flavor and balances the sweetness of the strawberries. The acidity of the lemon juice enhances the overall taste of the filling, making it more complex and satisfying. Be sure to taste the mixture before cooling it. If you feel it needs a bit more sweetness, feel free to adjust the sugar to your liking.
Thicker Filling with Cornstarch
Cornstarch is a vital ingredient for achieving the perfect consistency in your filling. It prevents the juices from becoming too runny, which is especially important when the pop tarts are baked. If you find your filling is still too runny after cooking, you can mix a little more cornstarch with a splash of cold water and return it to the heat for a few minutes until it thickens further.
Rolling Out the Pastry
With the filling cooling, it’s time to roll out the pastry for the final assembly. This step is crucial for achieving a consistent texture and ensures that the pop tarts bake evenly.
Tips for Rolling Out the Pastry
1. Flour the Surface: Before you begin rolling, dust your work surface and rolling pin with flour to prevent sticking. If the dough feels too sticky, sprinkle a little more flour as needed.
2. Achieving the Right Thickness: Roll the dough to about 1/8 inch thick, which will provide the right balance between flaky and sturdy. If the dough is too thin, the filling may seep through during baking, while too thick may result in a doughy texture.
3. Cutting Uniform Rectangles: Use a ruler and a sharp knife or pizza cutter to ensure your rectangles are uniform in size. Consistency in size is important for even baking and presentation.
4. Using Parchment Paper: As you cut the rectangles, transfer them to a parchment-lined baking sheet. This will not only prevent sticking but also make for easy cleanup once the pop tarts are baked.
Assembling the Pop Tarts
Now that everything is prepared, it’s time to bring your sweet strawberry dreams to life. The assembly process is both satisfying and creative, allowing you to personalize your pop tarts.
Step-by-Step Assembly
1. Prepare the Baking Sheet: Preheat your oven to 375°F (190°C) and line a baking sheet with parchment paper.
2. Fill the Pastry: Take one of the pastry rectangles and place a generous spoonful of the cooled strawberry filling in the center. Be careful not to overfill, as this can cause the filling to leak out during baking.
3. Top with Another Rectangle: Place a second pastry rectangle on top of the filled one, gently pressing the edges together to seal. You can use a fork to crimp the edges for an extra decorative touch and to ensure a tight seal.
4. Vent the Pop Tarts: Using a sharp knife, cut a few small slits in the top of each pastry. This allows steam to escape during baking and helps prevent the pop tarts from bursting.
5. Chill Before Baking: For the best results, refrigerate the assembled pop tarts for about 15 minutes before baking. This helps the pastry maintain its shape and flakiness.
With your pop tarts assembled, you are now ready to bake them to golden perfection. The aroma of fresh strawberries and buttery pastry will fill your kitchen as they bake, creating an irresistible treat that you and your loved ones will adore.
Stay tuned for the next part, where we’ll discuss the baking process, icing options, and tips for serving these delicious homemade strawberry pop tarts!
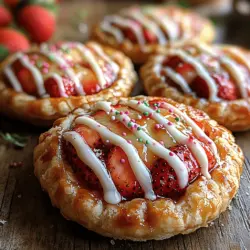
{{image_2}}
Filling and Sealing the Pastries
To create the perfect Sweet Strawberry Dreams pop tarts, the filling and sealing process is crucial. Start by preparing your strawberry filling, ensuring it’s not too runny, as excessive moisture can lead to overflow during baking. Aim for about 1 to 1.5 tablespoons of filling for each pastry rectangle. This amount provides enough flavor without risking any leakage.
When it comes to sealing the edges, proper technique is key. Lay out your pastry rectangles on a lightly floured surface. Place your filling in the center of one rectangle, leaving about a half-inch border around the edges. To seal the pop tarts, fold the other rectangle over the filled one, and press down gently around the edges. Use a fork to crimp the edges, creating a decorative border that also helps to secure the filling inside. Not only does this technique add a nice touch, but it also ensures that your delicious strawberry filling stays put during baking.
Another essential step is to create steam vents. Using a sharp knife or a toothpick, make a few small slits on the top of each pastry. This allows steam to escape during baking, preventing the crust from becoming soggy and ensuring an even bake.
Baking to Perfection
Preheating your oven is a fundamental step that should not be overlooked. Set your oven to 400°F (200°C) and allow it to fully preheat before placing the pop tarts inside. This ensures they begin baking immediately, yielding a flaky and golden crust.
Applying an egg wash before baking is also vital for achieving that beautiful golden finish. To create an egg wash, whisk together one egg with a tablespoon of water until well combined. Brush this mixture lightly over the top of each sealed pop tart. Not only does this give them a lovely color, but it also adds a slight richness to the crust.
Keep an eye on your pop tarts as they bake. They will typically take around 20-25 minutes to become perfectly golden. The edges will start to turn a deep golden brown, and you may see a slight bubbling of the filling through the steam vents. Once baked, remove them from the oven and let them cool on a wire rack. This cooling technique helps maintain their crispness, allowing the bottom to breathe and preventing sogginess.
Preparing the Icing
While your pop tarts are cooling, it’s the perfect time to prepare the icing. Start by sifting 1 cup of powdered sugar into a mixing bowl. Gradually add 2-3 tablespoons of milk, whisking until the mixture reaches a smooth, drizzle-friendly consistency. You want the icing to be thick enough to hold its shape but thin enough to drizzle easily. If it’s too thick, add a little more milk, one teaspoon at a time.
For a flavor boost, consider adding a splash of vanilla extract or a touch of citrus zest, such as lemon or orange, to enhance the sweetness of the icing. These flavor variations can take your Sweet Strawberry Dreams pop tarts to the next level, creating a delightful surprise for those who indulge.
Icing and Decorating
Once your pop tarts are completely cooled, it’s time to ice them. Using a spoon or a piping bag, drizzle the icing evenly over the top of each pastry. If you’re using a piping bag, snip a small hole at the end for more control over the drizzle. For a fun and colorful touch, consider decorating with vibrant sprinkles or edible glitter, which can elevate the presentation and make these treats even more inviting.
It’s important to allow the icing to set before serving. This typically takes about 15-20 minutes, depending on the humidity in your kitchen. Allowing the icing to firm up not only enhances the visual appeal but also makes them easier to handle and eat.
Serving Suggestions
Now that your Sweet Strawberry Dreams pop tarts are beautifully iced and decorated, it’s time to think about serving them. These delightful pastries make an excellent breakfast treat or a sweet snack. Pair them with a warm cup of coffee or a refreshing herbal tea for a delightful afternoon pick-me-up.
For an extra special occasion, consider serving them alongside fresh strawberries or a scoop of vanilla ice cream for dessert. The contrast of warm pastries with cold ice cream creates a mouthwatering experience that will impress your guests.
When it comes to storage, keep your pop tarts in an airtight container at room temperature for up to three days. If you want to extend their lifespan, consider freezing them. You can freeze the unbaked pastries before applying the egg wash and icing. When you’re ready to enjoy them, bake straight from the freezer, adding a few extra minutes to the baking time.
Nutritional Insights
As you indulge in your Sweet Strawberry Dreams pop tarts, it’s worthwhile to consider their nutritional content. Each homemade pastry contains essential nutrients thanks to the strawberries, which are rich in vitamin C, antioxidants, and dietary fiber. However, these pop tarts are also on the sweeter side, so moderation is key.
If you’re looking to make dietary modifications, consider using whole wheat flour for a more wholesome crust or substituting coconut sugar for a lower glycemic index sweetener. For those who need gluten-free options, almond flour can be an excellent substitute, although you may need to adjust the liquid amounts in the dough.
Conclusion
Creating homemade Sweet Strawberry Dreams pop tarts is a joyful experience that combines the art of baking with the delight of indulging in delicious treats. From the flaky crust to the luscious strawberry filling and sweet icing, every bite is a taste of nostalgia and comfort.
Encouraging you to explore variations and flavors, these pop tarts are incredibly versatile. Experiment with different fruit fillings, such as raspberry or blueberry, or add unique spices like cinnamon or nutmeg to the icing. The satisfaction derived from baking and sharing these delightful pastries with friends and family is truly unmatched. So roll up your sleeves, gather your ingredients, and embark on a sweet culinary adventure today!