Introduction to Crispy Coconut Chicken Strips
Crispy Coconut Chicken Strips are a delightful twist on a classic favorite, merging the flavors of tender chicken with a crunchy coconut and panko coating. This dish offers a tropical flair while retaining the familiar comfort of traditional chicken tenders. Whether you’re planning a family dinner, looking for a game day snack, or searching for the perfect party appetizer, these chicken strips deliver both flavor and texture that will satisfy a wide range of taste preferences. With their unique blend of spices and textures, Crispy Coconut Chicken Strips promise to become a staple in your meal rotation.
The appeal of Crispy Coconut Chicken Strips lies not just in their taste but also in their versatility. They can be served with a variety of dipping sauces, from sweet and tangy to spicy, allowing you to customize the experience for your guests. Additionally, the dish is easy to prepare, making it suitable for cooks of all skill levels. In this article, we will delve into the ingredients, preparation techniques, and serving suggestions to ensure your crispy coconut chicken strips are a hit every time.
Understanding the Ingredients
To create the perfect Crispy Coconut Chicken Strips, it is essential to understand the fundamental components that make this recipe shine. Each ingredient plays a crucial role in achieving the ideal combination of flavor and texture.
Chicken Breast
Choosing the right chicken is vital for juiciness and flavor. Boneless, skinless chicken breasts are the most common choice for this recipe due to their mild taste and tender texture. When preparing the chicken, it’s important to cut it into uniform strips, typically about 1-inch wide. This ensures even cooking and a consistent texture throughout. If the strips are too thick, they may remain undercooked on the inside, while thinner strips risk drying out. Proper preparation of the chicken lays the foundation for a delicious dish.
Dry Ingredients
The dry ingredients in this recipe play a significant role in the overall flavor profile. All-purpose flour serves as the base for the breading, providing the initial layer that helps the coating stick to the chicken. When combined with spices like garlic powder, onion powder, and paprika, the flour transforms into a flavorful component that enhances the chicken’s taste. Garlic powder adds depth, onion powder brings sweetness, and paprika contributes a subtle smokiness. These spices work together to elevate the dish beyond its basic components.
Coconut and Panko Breadcrumbs
The use of unsweetened shredded coconut is crucial for achieving an authentic taste. Sweetened coconut can overpower the dish with unnecessary sweetness, which is not desirable in savory applications. Unsweetened shredded coconut offers a rich, nutty flavor that complements the chicken beautifully. Panko breadcrumbs, another key ingredient, provide superior crunch compared to traditional breadcrumbs. Their larger, flakier texture allows for greater air circulation during frying, resulting in a lighter, crispier coating.
Seasoning Options
To tailor the dish to your taste, consider adjusting the spice levels with cayenne pepper for added heat. This can elevate the flavor profile and provide a delightful contrast to the sweetness of the coconut. Additionally, feel free to customize the seasoning blend according to personal preferences. Experimenting with herbs and spices can lead to exciting variations that keep the dish fresh and interesting.
Cooking Oil Choices
The choice of cooking oil can significantly impact both the flavor and healthiness of your Crispy Coconut Chicken Strips. Coconut oil is an excellent option, as it complements the coconut in the recipe and provides a distinct tropical aroma. However, vegetable oil is also a suitable choice and tends to have a higher smoke point, making it easier to achieve the perfect frying temperature. Consider the health implications of each oil, as well as the flavor profiles they can impart, to select the best option for your cooking needs.
Preparing the Chicken Strips
Preparing the chicken strips properly is crucial to achieving the perfect texture and flavor. Below is a step-by-step guide to ensure your chicken strips are ready for breading and frying.
Ensuring Proper Chicken Preparation
Before breading, it’s essential to ensure the chicken strips are adequately prepared. Start by drying the chicken strips with paper towels. This step is often overlooked but is vital to achieving a crispy coating. Excess moisture can lead to steaming rather than frying, resulting in a soggy texture. Once dried, consider lightly seasoning the chicken with salt and pepper to enhance its natural flavor.
Additionally, to keep the chicken tender during frying, you may want to marinate the strips in a mixture of buttermilk or yogurt for at least 30 minutes. This not only adds flavor but also helps to tenderize the meat, making it juicier and more succulent after frying.
Setting Up Your Breading Station
To streamline the breading process, it’s important to set up an organized workspace. Start by gathering all the necessary ingredients: the flour mixture, beaten eggs, and the coconut-panko mixture. Arrange them in a line, creating a systematic flow from one dish to the next. This not only makes the process more efficient but also minimizes mess.
1. Dredging Dish: Fill a shallow dish with all-purpose flour mixed with your chosen spices.
2. Egg Wash Dish: In another shallow bowl, beat a few eggs until well mixed. This will act as the adhesive for the breading.
3. Coating Dish: In a third shallow bowl, combine unsweetened shredded coconut and panko breadcrumbs.
By organizing your breading station in this manner, you ensure a smooth and efficient process, allowing you to focus on achieving that perfect crispy texture.
The Breaded Process
Now that you have your chicken prepared and your workstation organized, it’s time to master the breading technique that will lead to perfectly crispy chicken strips.
Dredging in Flour
Begin by taking a chicken strip and dredging it in the flour mixture. To prevent clumping, ensure that you coat the chicken evenly, shaking off any excess flour before moving on to the egg wash. This step is crucial as it forms the first layer of the coating, which helps the egg adhere better to the chicken.
Egg Coating
After dredging in flour, dip the chicken strip into the beaten eggs, making sure it is fully coated. The egg wash serves as a binder, helping the coconut and panko mixture stick during frying. Allow any excess egg to drip off before transferring the chicken to the coconut-panko mixture. Ensure that each strip is thoroughly coated, pressing gently to help the breadcrumbs adhere. This two-step process of dredging and coating will create a delightful crunch that is both satisfying and flavorful.
By following these initial steps carefully, you set the stage for creating Crispy Coconut Chicken Strips that are not only visually appealing but also packed with flavor and crunch. In the next sections, we will dive deeper into the frying techniques and serving suggestions to elevate this dish even further. Stay tuned for more insights on how to perfect your coconut chicken strips and impress friends and family alike!
{{image_2}}
The Importance of Beating the Eggs for Proper Adhesion
One of the fundamental steps in preparing crispy coconut chicken strips is ensuring that the egg wash is properly beaten. Beating the eggs until fully combined creates a smooth mixture that will effectively coat the chicken strips. This step is crucial because a well-mixed egg wash adheres better to the meat, allowing the coconut-panko coating to stick firmly during frying. The egg proteins will help bind the dry ingredients to the chicken, ensuring that every bite is packed with flavor and texture.
Coconut-Panko Coating
To achieve that signature crunch, the coconut-panko coating is essential. This mixture combines sweetened shredded coconut and panko breadcrumbs, which together create a light and crispy exterior.
Best Practices for Pressing the Coating to Ensure It Sticks
When coating the chicken strips, it’s important to press the coconut-panko mixture firmly onto the surface of the chicken. This creates a strong bond that will hold up during frying. Here are some best practices to follow:
– Use One Hand for Wet and One Hand for Dry: Designate one hand for dipping the chicken in the egg wash and the other for coating it with the coconut-panko mixture. This will prevent clumping and keep the dredging process clean.
– Press Firmly: After placing the chicken strip in the coating, press down gently but firmly. This helps the mixture adhere more effectively, ensuring that the coating stays intact while frying.
– Let It Rest: After coating, let the chicken strips sit for a few minutes. This resting period allows the coating to set, which helps it adhere even better in the frying process.
Cooking Method
The cooking method is crucial for achieving perfectly crispy coconut chicken strips. Frying is the best technique for this recipe, as it creates a deliciously crunchy exterior while keeping the chicken tender and juicy inside.
Heating the Oil
Before you start frying, it’s essential to heat your oil properly.
Signs That the Oil Is Ready for Frying
To know when your oil is ready, look for these signs:
– Temperature Check: A good frying temperature is typically between 350°F and 375°F (175°C to 190°C). You can use a kitchen thermometer for an accurate reading.
– Bubbles: When you dip the end of a wooden spoon or chopstick into the oil, if you see bubbles forming around it, the oil is hot enough for frying.
– Sizzle Test: Drop a small piece of the coconut-panko coating into the oil. If it immediately sizzles and rises to the surface, you are ready to fry.
Recommended Frying Temperatures for Optimal Crispiness
Maintaining the right frying temperature is vital. Lower temperatures can lead to greasy chicken strips, while too high temperatures can burn the coating before the chicken is cooked through. Aim to keep the oil temperature steady between 350°F to 375°F throughout the frying process.
Frying the Chicken Strips
When you are ready to fry, it’s essential to do so in batches rather than overcrowding the pan.
How to Avoid Overcrowding the Pan
Overcrowding can lower the oil temperature, causing the chicken strips to steam rather than fry. Here’s how to prevent this:
– Fry in Batches: Depending on your pan size, fry about 3-4 strips at a time. This allows the oil to remain hot and ensures even cooking.
– Leave Space Between Strips: Make sure there is space between each chicken strip to allow hot oil to circulate freely, resulting in an even, crispy texture.
Timing Tips for Achieving Golden Brown Perfection
Typically, chicken strips take about 4-5 minutes per side to fry, but this can vary based on thickness. Here are some timing tips:
– Watch for Color: Fry until the chicken strips are golden brown, flipping them halfway through. This ensures both sides get evenly crisped.
– Use a Slotted Spoon: After they are golden brown, use a slotted spoon to remove the strips from the oil, allowing excess oil to drain off.
Draining Excess Oil
After frying, it’s important to drain the excess oil to keep the chicken strips crispy.
Techniques for Removing Excess Oil Post-Frying
Here are some effective techniques:
– Paper Towels: Place fried chicken strips on a plate lined with paper towels. This absorbs excess oil and helps maintain the crispiness of the coating.
– Cooling Rack: Alternatively, place the chicken strips on a cooling rack set over a baking sheet. This allows air to circulate around the strips and prevents them from sitting in any excess oil.
The Importance of Using Paper Towels for a Crispier Finish
Using paper towels is crucial for achieving that desirable crunchy texture. It prevents the chicken from becoming soggy, ensuring that every bite remains crisp and delicious.
Serving Suggestions
Crispy coconut chicken strips are versatile and can be served in various ways to delight your guests.
Ideal Dipping Sauces
No chicken strip dish is complete without a variety of dipping sauces.
Sweet Chili Sauce: A Classic Pairing
Sweet chili sauce is a fantastic accompaniment to crispy coconut chicken strips, providing a perfect balance of sweetness and heat. Its sticky texture clings beautifully to the chicken, enhancing each bite.
Other Sauce Options: Tangy Dips and Homemade Sauces
In addition to sweet chili sauce, consider offering:
– Honey Mustard Sauce: A creamy, tangy option that complements the coconut flavor.
– Spicy Sriracha Mayo: For those who enjoy a kick, mixing sriracha with mayonnaise creates a creamy yet spicy dip.
– Pineapple Salsa: A fresh and fruity option that adds a tropical twist to the dish.
Presentation Ideas
How you serve your crispy coconut chicken strips can elevate the dining experience.
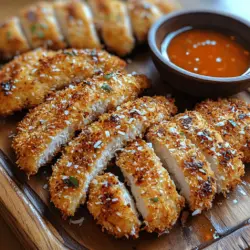
Serving on a Rustic Wooden Platter for Aesthetic Appeal
Consider serving the chicken strips on a rustic wooden platter. This not only adds charm but also creates an inviting presentation. Pair with colorful dips in small bowls for a vibrant display.
Garnishing with Fresh Herbs and Citrus for Vibrant Color
Garnish the platter with fresh herbs like cilantro or parsley, and add wedges of lime or lemon for a burst of color. This not only enhances the visual appeal but also provides a zesty touch that can be squeezed over the chicken before eating.
Nutritional Information
Crispy coconut chicken strips can be a delightful addition to your meal, but it’s also essential to consider their nutritional aspects.
Caloric Breakdown
Estimating the calories in this dish can vary based on portion size and cooking method. However, on average, one serving (about 3-4 strips) contains approximately 300-400 calories. This includes calories from chicken, coconut, and panko.
Nutritional Benefits of the Ingredients Used
– Coconut: Provides healthy fats and fiber, which can help with satiety.
– Chicken: A good source of protein, aiding in muscle repair and growth.
– Panko: A lighter alternative to traditional breadcrumbs, offering a crispier texture with fewer calories.
Dietary Considerations
Crispy coconut chicken strips can be adapted to meet various dietary needs.
Gluten-Free Adaptations If Necessary
For those who are gluten-sensitive, simply replace regular panko with gluten-free panko breadcrumbs. Additionally, ensure that the chicken is coated in a gluten-free flour for the egg wash.
Suggestions for Making the Dish Healthier
To make this dish healthier, consider the following:
– Baking Instead of Frying: Coating the chicken and baking it in the oven can create a crispy texture with less oil.
– Air Frying: Use an air fryer for a lower-calorie option that still delivers on crispiness.
Conclusion
Crispy Coconut Chicken Strips stand out as a versatile dish that combines flavor, texture, and ease of preparation. This recipe not only showcases how simple ingredients can be transformed into a delicious meal but also provides a fun cooking experience for anyone in the kitchen. Whether served as an appetizer or a main dish, these chicken strips are sure to impress. Enjoy the delightful crunch and tropical taste that makes this dish a cherished favorite for all occasions.